1. Einleitung
1.1. Hintergrund
Warum macht sich jemand die Mühe in Zeiten von NAS-Systemen einen eigenen Server zu betreiben. Und das ganze noch zu Hause?
Nothing is troublesome that we do willingly.
(Was wir freiwillig tun, bereitet uns keine Mühe.)
Meine Motivation dahinter ist, dass ein Server viel mehr Freiheiten bietet, als ein reines NAS-System. Es können beliebige Dienste installiert werden, nicht nur die vom NAS-Hersteller unterstützen. Außerdem können Sicherheitslücken direkt geschlossen werden, wenn die Patches von der Distibution bereit gestellt werden. Man ist nicht auf den Hersteller angewiesen, dass der die Sicherheitslücken zeitnah durch Updates auf seinem NAS schließt, wenn überhaupt.
Diese Anleitung erklärt, wie ein Debian basierter Server per Debootstrap aufgesetzt werden kann.
1.2. Der Ablauf im Überblick
|
Aktuell wird dieses Dokument an Debian Bullseye angepasst. Die Anleitung ist bis zu "Basissystems konfigurieren" (Kapitel 4) getestet. |
|
Im Anhang Kopiervorlage Befehle sind noch einmal alle Befehle ohne den Prompt aufgeführt, so dass sie eine bessere Copy&Paste Vorlage abgeben. |
-
Debian Live Image booten
-
Basissystems installieren
-
Basissystem konfigurieren
-
Software installieren und konfigurieren
2. Debian Live Image vorbereiten
2.1. Live Image besorgen
Zuerst muss ein Debian Live Image besorgt werden. Dazu kann ein vorgefertigtes Image heruntergeladen werden. Dieses ISO-Images wird dann auf eine CD gebrannt oder auf einem USB-Stick installiert. Anschließend wird von CD bzw. USB-Stick gebootet.
Für diese Anleitung wird das von Debian bereit gestellte Standard-Image verwendet, welches nur über die Konsole bedient wird.
Nachdem von dem Image gebootet wurde, sollte das System gestartet sein und der Prompt des Live-Users da sein.
Falls nach Username und Passwort gefragt wird: Bei Debian Live ist der Username user und das Passwort dazu live.
2.2. Tastaturlayout ändern (optional)
Nach dem Login ist noch das englische QWERTY-Tastaturlayout aktiv.
Um das Tastaturlayout zu ändern, wird das Paket keyboard-configuration neu konfiguriert mittels
user@debian:~$ sudo dpkg-reconfigure keyboard-configuration
-
Keyboard model: Generic 105-key (Intl) PC
-
Keyboard layout: German - German (no dead keys)
-
Key to function as AltGr: The default for the keyboard layout
-
Compose key: No compose key
Danach muss die erzeugte Datei /etc/default/keyboard noch neu eingelesen werden, das passiert mit dem Tool setupcon
user@debian:~$ sudo setupcon
2.3. Encoding und Zeichensatz anpassen (optional)
Damit auf der Console die korrekten Zeichen für die ASCII Rahmen vewendet werden, muss das Encoding UTF-8 verwendet werden. Dazu wird console-setup frisch konfiguriert
user@debian:~$ sudo dpkg-reconfigure console-setup
-
Encoding to use on the console:
UTF-8 -
Characterset to support: Guess optimal character set
-
Font for the console: Fixed
-
Font size: 8x16
2.4. Repositories aktualisieren
Damit alle Softwarepakete installiert werden können, muss apt seine Repositories aktualisieren.
user@debian:~$ sudo apt update
2.5. ssh Zugang aktivieren (optional)
Jetzt kann optional noch der ssh Zugang aktiviert werden, wozu ein SSH Server benötigt wird.
Dazu wird das Paket openssh-server installiert
user@debian:~$ sudo apt install -y openssh-server
Anschließend muss der SSH-Service noch gestartet werden.
user@debian:~$ sudo systemctl start ssh
Beim Konfigurieren des Paketes werden dann die SSH-Schlüssel des Servers erzeugt.
[...]
Creating config file /etc/ssh/sshd_config with new version
Creating SSH2 RSA key; this may take some time ...
3072 SHA256:LIfJkQeffiQT1i0zER4jWdS73bwH5IW3aESTE68XQXA root@debian (RSA)
Creating SSH2 ECDSA key; this may take some time ...
256 SHA256:2RRemYlbbLfqockXT9zr17C7419ap0b7L2h+WroJTH8 root@debian (ECDSA)
Creating SSH2 ED25519 key; this may take some time ... 256
SHA256:g4fVign4yeHBeNgJ8y5W3vf4i3hGK5P9Hqey8szp78 root@debian (ED25519)
[...]
2.6. ssh Schlüssel-Fingerprint prüfen (optional)
Beim ersten SSH-Login auf einem Server mit unbekanntem (oder geändertem) SSH-Schlüssel zeigt der SSH-Client den Fingerprint des Serverschlüssels an.
Die Fingerprints der Serverschlüssel können mittels ssh-keygen auch nochmal angezeigt werden.
Der im SSH-Client angezeigt Fingerprint sollte mit dem passenden Serverschlüssel verglichen werden, um sicherzustellen, dass der richtige Server beim Login verwendet wird.
user@debian:~$  for keyfile in /etc/ssh/*.pub; do echo "${keyfile}:"; ssh-keygen -l -f "${keyfile}"; done (1)
/etc/ssh/ssh_host_ecdsa_key.pub:
256 SHA256:wlJkPzJOntv89qUhC34jmsB5S7OBAqKRk580ph/0CIg root@debian (ECDSA)
/etc/ssh/ssh_host_ed25519_key.pub:
256 SHA256:vXGK/Y6bHkiU9hgO5u9ZFY2hV/IcuSik1zBBr2k+YiI root@debian (ED25519)
/etc/ssh/ssh_host_rsa_key.pub:
3072 SHA256:eWLwj6xBJd9BAqbfIuSAX/gYrHEe4mkfE1mFOHIASvg root@debian (RSA)

user@debian:~$  for keyfile in /etc/ssh/*.pub; do echo "${keyfile}:"; ssh-keygen -l -E md5 -f "${keyfile}"; done (2)
/etc/ssh/ssh_host_ecdsa_key.pub:
256 MD5:9a:b0:48:b3:04:e9:22:48:fd:ea:70:25:53:09:39:be root@debian (ECDSA)
/etc/ssh/ssh_host_ed25519_key.pub:
256 MD5:3d:5b:96:24:2d:ae:d0:22:95:b5:ca:d6:73:05:d0:e4 root@debian (ED25519)
/etc/ssh/ssh_host_rsa_key.pub:
3072 MD5:a8:4b:b8:9e:19:74:47:d2:96:80:90:13:05:5b:f9:11 root@debian (RSA)
| 1 | Mit einer Schleife können alle Schlüssel aufgelistet werden |
| 2 | Falls md5 benötigt wird, kann das bei ssh-keygen mit dem Parameter -E md5 erreicht werden |
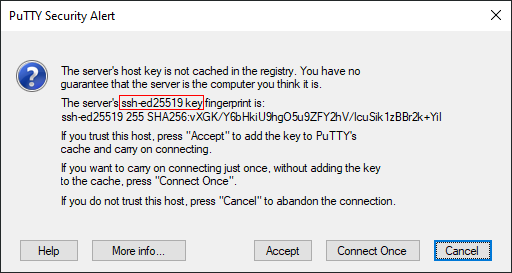
2.7. Login mittels ssh (optional)
Falls der ssh-Zugang aktiviert wurde, kann nun von einem anderen Rechner auf den Server zugegriffen werden. Unter Windows kann z.B. Putty, unter Linux die Secure Shell ssh verwendet werden. Das erleichtert die Arbeit, da so Copy & Paste verwendet werden kann.
|
Debian Live verwendet den Usernamen |
[me@local ~]$ ssh user@debian
The authenticity of host 'debian (x.x.x.x)' can't be established. (1)
ED25519 key fingerprint is SHA256:vXGK/Y6bHkiU9hgO5u9ZFY2hV/IcuSik1zBBr2k+YiI. (2)
This key is not known by any other names
Are you sure you want to continue connecting (yes/no/[fingerprint])? yes
Warning: Permanently added 'debian' (ED25519) to the list of known hosts.
user@debian's password: (3)
Linux debian 5.10.0-8-amd64 #1 SMP Debian 5.10.46-4 (2021-08-03) x86_64

The programs included with the Debian GNU/Linux system are free software;
the exact distribution terms for each program are described in the
individual files in /usr/share/doc/*/copyright.

Debian GNU/Linux comes with ABSOLUTELY NO WARRANTY, to the extent
permitted by applicable law.
{prompt-user}
| 1 | x.x.x.x: Die aufgelöste IP-Adresse des Servers |
| 2 | Hier kann der Fingerprint des Servers gepüft werden |
| 3 | Jetzt erfolgt der Login auf dem Server |
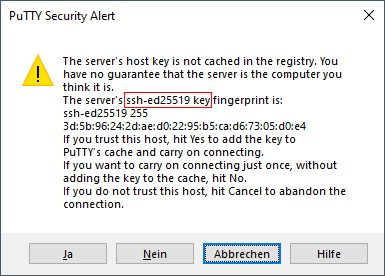
Sollte eine Verbindung nicht möglich sein, da SSH sich beschwert, dass sich der Schlüssel geändert hat, so kann das geprüft werden. Das ist der Fall, wenn das Live-System neu gebootet wird. Denn dann muss der SSH-Server wieder neu installiert werden, und dabei werden neue Schlüssel generiert.
[me@local ~]$ ssh user@debian
@@@@@@@@@@@@@@@@@@@@@@@@@@@@@@@@@@@@@@@@@@@@@@@@@@@@@@@@@@@
@    WARNING: REMOTE HOST IDENTIFICATION HAS CHANGED!     @
@@@@@@@@@@@@@@@@@@@@@@@@@@@@@@@@@@@@@@@@@@@@@@@@@@@@@@@@@@@
IT IS POSSIBLE THAT SOMEONE IS DOING SOMETHING NASTY!
Someone could be eavesdropping on you right now (man-in-the-middle attack)!
It is also possible that a host key has just been changed.
The fingerprint for the ED25519 key sent by the remote host is
SHA256:4r1Ja4DD/0YTCqb2t1D8A7zvteMaoNzw+xnGdyPXleY. (1)
Please contact your system administrator.
Add correct host key in /home/me/.ssh/known_hosts to get rid of this message.
Offending ED25519 key in /home/me/.ssh/known_hosts:1 (2)
Host key for debian has changed and you have requested strict checking.
Host key verification failed.
| 1 | <Fingerprint>: Der Fingerprint des geänderten Schlüssels, den der Server aktuell verwendet |
| 2 | Die betroffene Zeile in der Datei known_hosts |
Der Fingerprint eines bereits in known_hosts hinzugefügten Schlüssel kann mit dem Parameter -F angezeigt werden
[me@local ~]$ ssh-keygen -l -F debian
# Host debian found: line 1
debian ED25519 SHA256:vXGK/Y6bHkiU9hgO5u9ZFY2hV/IcuSik1zBBr2k+YiI
# Host debian found: line 2
debian RSA SHA256:eWLwj6xBJd9BAqbfIuSAX/gYrHEe4mkfE1mFOHIASvg
# Host debian found: line 3
debian ECDSA SHA256:wlJkPzJOntv89qUhC34jmsB5S7OBAqKRk580ph/0CIg
Ggf. kann der gespeicherte Schlüssel aus der Datei gelöscht werden, dann fragt ssh beim Öffnen der nächsten Verbindung wieder nach, ob der Schlüssel hinzugefügt werden soll. Bevor das gemacht wird, sollte aber der Fingerprint genau geprüft werden, dass die Verbindung auch zum richtigen Server aufgebaut wird (siehe ssh Schlüssel-Fingerprint prüfen (optional) ).
[me@local ~]$ ssh-keygen -R debian
# Host debian found: line 1
# Host debian found: line 2
# Host debian found: line 3
/home/me/.ssh/known_hosts updated.
Original contents retained as /home/me/.ssh/known_hosts.old
3. Basissystem installieren
Nachdem das Live-System gebootet und konfiguriert ist, kann nun das Basissystem installiert werden.
3.1. Laufwerke vorbereiten
Bevor das zukünftige System installiert werden kann, müssen die Laufwerke vorbereitet werden.
Heutzutage bietet es sich an, das System auf eine schnelle SSD auszulagern und die Daten auf eine große magnetische Festplatte zu speichern.
Zuerst sollten magnetische Festplatten geprüft werden, um mögliche Fehler bereits im Vorfeld zu erkennen.
Dann werden die Laufwerke partitioniert und zum Schluss die neu erstellten Partitionen verschlüsselt.
3.1.1. Gerätenamen ermitteln
Mit dem Befehl lsblk wird eine Baumstruktur der Geräte angezeigt.
Dadurch kann ermittelt werden, welche Festplatten zur Verfügung stehen.
user@debian:~$ lsblk
NAME  MAJ:MIN RM   SIZE RO TYPE MOUNTPOINT
loop0   7:0    0 611.2M  1 loop /usr/lib/live/mount/rootfs/filesystem.squashfs
sdX     8:0    0   128G  0 disk
sdY     8:16   0   3.7T  0 disk
sr0    11:0    1   945M  0 rom  /run/live/medium
Hier ist die SSD als Device sdX eingebunden, die HDD für die Daten als sdY.
Die beiden anderen Einträge werden vom Live-Betriebssystem benötigt.
|
Damit bei Copy & Paste keine Daten versehentlich zerstört werden, werden in den aufgeführten Befehlen für die Laufwerke die Shellvariablen ${DEVX} und ${DEVY} verwendet. Diese Variablen müssen dann enstsprechend auf die ermittelten Laufwerksnamen gesetzt werden user@debian:~$ export DEVX=/dev/sdX user@debian:~$ export DEVY=/dev/sdY |
3.1.2. Magnetische Festplatte prüfen
Als erstes wird nun die frisch verbaute HDD geprüft.
Dazu kommt das Tool badblocks zum Einsatz.
user@debian:~$ sudo badblocks -c 1024 -s -w -t random -v ${DEVY}
Das Tool beschreibt die Festplatte mit zufälligen Bitmustern und prüft, dass Schreib- und Lesevorgang fehlerfrei sind.
3.1.3. Partitionierung
Damit die Festplatten mit Verschlüsselung verwendet werden können, benötigt Linux vier Partitionen.
Die erste Partition mit einem MB dient als "Bios boot"-Partition, die GRUB verwendet, um den Bootloader zu installieren.
Die zweite dient als Boot-Partition /boot, in der je nach Größe mehrere Kernels gespeichert werden können.
Die dritte, größte Partition (für das Root-Filesystem /) enthält das komplette Betriebssystem und die vierte Partition wird für Swap verwendet.
|
TODO: Wird eine Swap-Partition benötigt, oder reicht heutzutage nicht auch ein Swapfile? |
Die zweite Festplatte wird dann als fünfte Partition verwendet. Hier sollen die ganzen Daten gespeichert werden.
Mit dem Befehl cfdisk können nun die Partitionen auf den Laufwerken manuell erstellt werden.
Laufwerk 1
user@debian:~$ sudo cfdisk ${DEVX}
Laufwerk 2
user@debian:~$ sudo cfdisk ${DEVY}
Anschießend sollte lsblk etwas in dieser Art ausgeben:
user@debian:~$ lsblk
NAME   MAJ:MIN RM   SIZE RO TYPE MOUNTPOINT
loop0    7:0    0 611.2M  1 loop /usr/lib/live/mount/rootfs/filesystem.squashfs
sdX      8:0    0   128G  0 disk
├─sdX1   8:1    0     1M  0 part
├─sdX2   8:1    0   250M  0 part
├─sdX3   8:2    0   127G  0 part
└─sdX4   8:3    0   772M  0 part
sdY      8:16   0   3.7T  0 disk
└─sdY1   8:17   0   3.7T  0 part
sr0     11:0    1   945M  0 rom  /run/live/medium
3.2. Vollverschlüsselung des Systems
|
Inzwischen gibt es zwei Möglichkeiten einer Vollverschlüsselung des Systems. Zum einen die bisher übliche Version, in der die Boot-Partition unverschlüsselt bleibt, da in ihr das initiale Startsystem vorliegt. Mit diesem erfolgt dann die Entschlüsselung der restlichen Partitionen.
Das bietet aber Angreifern, die direkten Zugang zur Hardware haben, die Möglichkeit, die Dateien auf Zum anderen der neue Ansatz mit verschlüsselter Boot-Partition, da inzwischen der Bootloader Grub die Möglichkeit bietet, verschlüsselte Partitionen zu öffnen.
Diese müssen dann aktuell aber noch im Format LUKS v1 vorliegen und die Eingabe der Passphrase muss zwingend über eine Tastatur erfolgen. |
In dieser Anleitung geht es um einen Heimserver, mit Betonung auf Server, so dass ein Start auch ohne Tastatur und Monitor (headless) möglich sein soll.
Deshalb muss die Möglichkeit bestehen, beim Booten des Servers die Passphrase zur Entschlüsselung mittels ssh einzugeben. Deswegen kommt Variante eins mit unverschlüsselter Boot-Partition zum Einsatz.
|
Im Anhang [appendix_encrypted_boot] wird die Variante mit verschlüsselter Boot-Partition beschrieben. |
3.2.1. unverschlüsselte Boot-Partition
Die kleine Boot-Partition /dev/sdX2 wird unverschlüsselt mit dem gewünschten Linux-Filesystem (hier ext4) formatiert.
user@debian:~$ sudo mkfs.ext4 -L BOOT ${DEVX}2
mke2fs 1.46.2 (28-Feb-2021)
Creating filesystem with 256000 1k blocks and 64000 inodes
Filesystem UUID: 7406d935-17d8-4432-8dc6-4b55fd0575c9
Superblock backups stored on blocks:
        8193, 24577, 40961, 57345, 73729, 204801, 221185

Allocating group tables: done
Writing inode tables: done
Creating journal (4096 blocks): done
Writing superblocks and filesystem accounting information: done
3.2.2. Festplattenverschlüsselung mit cryptsetup
Für die Verschlüsselung der weiteren Partitionen wird das Paket cryptsetup installiert, mit dem dann die LUKS-Devices erzeugt werden.
user@debian:~$ sudo apt install -y cryptsetup
Jetzt werden die verbliebenen Partitionen mit einer sicheren Passphrase angelegt.
Außerdem bekommt jede Partition noch eine Schlüsseldatei.
Dadurch wird nur einmalig die Passphrase der Root-Partition abgefragt und im weiteren Verlauf werden dann die Schlüsseldateien zum Öffnen der Partitionen verwendet.
|
In der heutigen Zeit ist es wichtig, immer unterschiedliche Passwörter/-phrasen zu verwenden. Zur Verwaltung empfiehlt es sich, eine Passwortsafe-Anwendung zu verwenden, wie z.B. KeepassXC. Die Schlüsseldateien sollten, genau wie die Passphrases gesichert werden, so dass im Falle eines Falles die Partitionen entschlüsselt werden können. Das kann entweder durch Ausdrucken oder durch Speichern auf einem externen Datenträger passieren. |
3.2.3. Schlüsseldateien erzeugen
Die Schlüsseldateien werden aus 128 zufälligen Zeichen erstellt.
Aus der Ausgabe von /dev/urandom werden mittels tr nur druckbare Zeichen gefiltert und durch head nur die ersten 128 Zeichen verwendet.
Dann werdenaus Sicherheitsaspekten die Schlüsseldatein dem root-User zugeordnet und nur für diesen lesbar gemacht.
user@debian:~$ tr -dc '[:graph:]' </dev/urandom | head -c 128 > data.key
user@debian:~$ tr -dc '[:graph:]' </dev/urandom | head -c 128 > root.key
user@debian:~$ tr -dc '[:graph:]' </dev/urandom | head -c 128 > swap.key
user@debian:~$ sudo chown root:root *.key
user@debian:~$ sudo chmod 600 *.key
3.2.4. Partitionen verschlüsseln
Eine Partition wird durch 4 Schritte verschlüsselt und für die Installation vorbereitet
-
Verschlüsselung mit guter Passphrase
-
Schlüsseldatei als zweiten Schlüssel hinzufügen
-
Partition öffnen
-
und formatieren
ROOT
Die große Partition /dev/sdX3 wird für das Betriebssystem verwendet und hier wird die Passphrase vergeben, die später vor dem Booten des Sytems eingegeben werden muss.
user@debian:~$ sudo cryptsetup -c aes-xts-plain64 -s 512 luksFormat ${DEVX}3

WARNING!
========
This will overwrite data on /dev/sdX3 irrevocably.

Are you sure? (Type 'yes' in capital letters): YES
Enter passphrase for /dev/sdX3:
Verify passphrase:
user@debian:~$ sudo cryptsetup luksAddKey ${DEVX}3 root.key
Enter any existing passphrase:
user@debian:~$ sudo cat root.key | sudo cryptsetup luksOpen ${DEVX}3 crypt_root
user@debian:~$ sudo mkfs.ext4 -L ROOT /dev/mapper/crypt_root
mke2fs 1.46.2 (28-Feb-2021)
Creating filesystem with 33288192 4k blocks and 8323072 inodes
Filesystem UUID: 086a50df-0ac8-482e-92da-3da533d380d0
Superblock backups stored on blocks:
        32768, 98304, 163840, 229376, 294912, 819200, 884736, 1605632, 2654208,
        4096000, 7962624, 11239424, 20480000, 23887872

Allocating group tables: done
Writing inode tables: done
Creating journal (131072 blocks): done
Writing superblocks and filesystem accounting information: done
SWAP
Das selbe Vorgehen für /dev/sdx4 als Swap, nur dass anstatt der Formatierung der SWAP-Bereich erzeugt wird.
user@debian:~$ sudo cryptsetup -c aes-xts-plain64 -s 512 luksFormat ${DEVX}4

WARNING!
========
This will overwrite data on /dev/sdX4 irrevocably.

Are you sure? (Type 'yes' in capital letters): YES
Enter passphrase for /dev/sdX4:
Verify passphrase:
user@debian:~$ sudo cryptsetup luksAddKey ${DEVX}4 swap.key
Enter any existing passphrase:
user@debian:~$ sudo cat swap.key | sudo cryptsetup open ${DEVX}4 crypt_swap
user@debian:~$ sudo mkswap -L SWAP /dev/mapper/crypt_swap
Setting up swapspace version 1, size = 756 MiB (792719360 bytes)
LABEL=SWAP, UUID=043e1713-e6b8-4a59-bc5b-4df02fcb7241
DATA
Zum Schluss wird das Ganze nochmal für die Datenpartition /dev/sdY1 wiederholt
user@debian:~$ sudo cryptsetup -c aes-xts-plain64 -s 512 luksFormat ${DEVY}1

WARNING!
========
This will overwrite data on /dev/sdY1 irrevocably.

Are you sure? (Type 'yes' in capital letters): YES
Enter passphrase for /dev/sdY1:
Verify passphrase:
user@debian:~$ sudo cryptsetup luksAddKey ${DEVY}1 data.key
Enter any existing passphrase:
user@debian:~$ sudo cat data.key | sudo cryptsetup open ${DEVY}1 crypt_data
user@debian:~$ sudo mkfs.ext4 -L DATA /dev/mapper/crypt_data
mke2fs 1.46.2 (28-Feb-2021)
Creating filesystem with 7835575 4k blocks and 1962240 inodes
Filesystem UUID: 43227a69-6300-47ab-96c5-9288826affc2
Superblock backups stored on blocks:
        32768, 98304, 163840, 229376, 294912, 819200, 884736, 1605632, 2654208,
        4096000

Allocating group tables: done
Writing inode tables: done
Creating journal (32768 blocks): done
Writing superblocks and filesystem accounting information: done
Nun sind die Partitionen für die Installation vorbereitet, was die Ausgabe von lsblk auch zeigen sollte:
user@debian:~$ lsblk
NAME           MAJ:MIN RM   SIZE RO TYPE  MOUNTPOINT
loop0            7:0    0 687.3M  1 loop  /usr/lib/live/mount/rootfs/filesystem.squashfs
sdX              8:0    0   128G  0 disk
├─sdX1           8:1    0     1M  0 part
├─sdX2           8:2    0   250M  0 part
│ └─crypt_boot 253:0    0   248M  0 crypt
├─sdX3           8:3    0   127G  0 part
│ └─crypt_root 253:1    0   127G  0 crypt
└─sdX4           8:4    0   772M  0 part
  └─crypt_swap 253:2    0   756M  0 crypt
sdY              8:16   0   3.7T  0 disk
└─sdY1           8:17   0   3.7T  0 part
  └─crypt_data 253:3    0   3.7T  0 crypt
sr0             11:0    1   903M  0 rom   /run/live/medium
3.3. Partitionen einbinden
Damit das System auf die gerade angelegten und verschlüsselten Partitionen installiert werden kann, müssen diese in ein Verzeichnis des Livesystems eingebunden werden.
Zuerst wird die Systempartition eingebunden
user@debian:~$ sudo mkdir /mnt/debinst
user@debian:~$ sudo mount /dev/mapper/crypt_root /mnt/debinst
Danach wird die kleine Partition im boot-Verzeichnis des zukünftigen Systems eingebunden
user@debian:~$ sudo mkdir /mnt/debinst/boot
user@debian:~$ sudo mount ${DEVX}2 /mnt/debinst/boot
Dann noch die zweite Festplatte für die Daten
user@debian:~$ sudo mkdir /mnt/debinst/data
user@debian:~$ sudo mount /dev/mapper/crypt_data /mnt/debinst/data
3.4. Basissystem mittels Debootstrap installieren
Jetzt erfolgt die Installation mit debootstrap. Es kann ggf. auch ein passender Mirror verwendet werden.
user@debian:~$ sudo apt install -y debootstrap
user@debian:~$ sudo debootstrap --arch amd64 bullseye /mnt/debinst http://deb.debian.org/debian
3.5. chroot Umgebung vorbereiten
Nachdem das Basissystem installiert ist, wird nun die Schlüsseldatei für die Swap-Partition gleich in das neue System kopiert
user@debian:~$ sudo mkdir -m0700 /mnt/debinst/etc/keys
user@debian:~$ sudo cp *.key /mnt/debinst/etc/keys
user@debian:~$ sudo sh -c 'chmod 600 /mnt/debinst/etc/keys/*'
Damit in das neue System gewechselt werden kann, müssen vorher noch die Devices eingehängt werden:
user@debian:~$ sudo mount -o bind /dev /mnt/debinst/dev
user@debian:~$ sudo mount -t proc proc /mnt/debinst/proc
user@debian:~$ sudo mount -t sysfs sys /mnt/debinst/sys
user@debian:~$ sudo mount -t devpts devpts /mnt/debinst/dev/pts
Der Wechsel in die chroot-Umgebung des neuen Systems erfolgt mit
user@debian:~$ sudo LANG=C chroot /mnt/debinst /bin/bash
3.6. Basissystem fertig stellen
3.6.1. Passwort für root vergeben
Als root im neuen System angemeldet sollte gleich ein sicheres Passwort vergeben werden
root@debian:/# passwd
New password:
Retype new password:
passwd: password updated successfully
3.6.2. Console einstellen
Nun kann auch für das neue System wieder das passende Tastaturlayout eingestellt werden.
root@debian:/# apt install -y keyboard-configuration
-
Keyboard model: Generic 105-key (Intl) PC
-
Keyboard layout: German - German (no dead keys)
-
Key to function as AltGr: The default for the keyboard layout
-
Compose key: No compose key
Auch hier muss die erzeugte Datei /etc/default/keyboard neu eingelesen werden.
root@debian:/# apt install -y console-setup
root@debian:/# setupcon
Auch hier kann wieder das Encoding und der Zeichensatz angepasst werden
root@debian:/# dpkg-reconfigure console-setup
3.6.3. Zeitzone und Sprache(n) einstellen
Des weiteren können jetzt die gewünschte Zeitzone
root@debian:/# dpkg-reconfigure tzdata
und die benötigten locales
root@debian:/# apt install -y locales
root@debian:/# dpkg-reconfigure locales
eingestellt werden.
3.6.4. Editor anpassen
Falls gewünscht, kann vim installiert und nano deinstalliert werden
root@debian:/# apt install -y vim
root@debian:/# apt purge -y nano
3.6.5. Paketquellen aufnehmen
Jetzt werden die Quellen für apt in sources.list erweitert, damit Security-Updates installiert werden können.
Zusätzlich können auch noch StableUpdates und DebianBackports ergänzt werden, falls gewünscht.
Debian bietet drei Komponenten an, über die festgelegt wird, welche Software installiert werden soll.
Anstelle des offiziellen Servers http://deb.debian.org kann auch ein Mirror verwendet werden, um die Last auf die Repositories zu verteilen.
Falls Transportverschlüsselung mittels https erwünscht ist, müssen die CA-Zertifikate installiert werden.
root@debian:/# apt install -y ca-certificates
Jetzt kann der gewünschte Mirror festgelegt werden
root@debian:/# MIRROR=https://deb.debian.org
und dann die sources.list erzeugt werden
root@debian:/# printf "# DebianReleases\n">/etc/apt/sources.list
root@debian:/# printf "deb ${MIRROR}/debian bullseye main contrib non-free\n">>/etc/apt/sources.list
root@debian:/# printf "#deb-src ${MIRROR}/debian bullseye main contrib non-free\n">>/etc/apt/sources.list
root@debian:/# printf "\n# DebianSecurity\n">>/etc/apt/sources.list
root@debian:/# printf "deb https://deb.debian.org/debian-security/ bullseye-security main contrib non-free\n">>/etc/apt/sources.list
root@debian:/# printf "#deb-src https://deb.debian.org/debian-security/ bullseye-security main contrib non-free\n">>/etc/apt/sources.list
root@debian:/# printf "\n# StableUpdates\n">>/etc/apt/sources.list
root@debian:/# printf "deb ${MIRROR}/debian bullseye-updates main contrib non-free\n">>/etc/apt/sources.list
root@debian:/# printf "#deb-src ${MIRROR}/debian bullseye-updates main contrib non-free\n">>/etc/apt/sources.list
root@debian:/# printf "\n# DebianBackports\n">>/etc/apt/sources.list
root@debian:/# printf "deb ${MIRROR}/debian bullseye-backports main contrib non-free\n">>/etc/apt/sources.list
root@debian:/# printf "#deb-src ${MIRROR}/debian bullseye-backports main contrib non-free\n">>/etc/apt/sources.list
# DebianReleases
deb https://deb.debian.org/debian bullseye main contrib non-free
#deb-src https://deb.debian.org/debian bullseye main contrib non-free

# DebianSecurity
deb https://deb.debian.org/debian-security/ bullseye-security main contrib non-free
#deb-src https://deb.debian.org/debian-security/ bullseye-security main contrib non-free

# StableUpdates
deb https://deb.debian.org/debian bullseye-updates main contrib non-free
deb-src https://deb.debian.org/debian bullseye-updates main contrib non-free

# DebianBackports
deb https://deb.debian.org/debian bullseye-backports main contrib non-free
#deb-src https://deb.debian.org/debian bullseye-backports main contrib non-free
3.6.6. System aktualisieren
Die neuen Quellen werden mit folgendem Befehl bekannt gemacht und dann gleich noch die neuesten Updates installiert
root@debian:/# apt update
root@debian:/# apt full-upgrade -y
3.6.7. Cryptsetup und Filesysteme einrichten
Damit das neue System mit der Verschlüsselung klar kommt, muss wieder cryptsetup installiert und eingerichtet werden
root@debian:/# apt install -y cryptsetup
Jetzt werden die Konfigurationsdateien für das Dateisystem erstellt.
Zum einen ist das die Datei /etc/crypttab, welche die Infos für die verschlüsselten Partitionen enthält.
Dazu müssen nochmal die Variablen für die Laufwerke gesetzt werden.
root@debian:/# export DEVX=/dev/sdX
root@debian:/# export DEVY=/dev/sdY
Die benötigten UUIDs werden mit dem Befehl blkid ermittelt. Als $() kann die Ausgabe dann direkt verwendet werden.
Die Partitionen müssen zum einen in der /etc/crypttab als Laufwerke eingetragen werden,
root@debian:/# printf "# <target name> <source device>                        <key file>          <options>\n">/etc/crypttab
root@debian:/# printf "crypt_root  UUID=$(blkid -o value -s UUID ${DEVX}3)   none                luks\n">>/etc/crypttab
root@debian:/# printf "crypt_swap  UUID=$(blkid -o value -s UUID ${DEVX}4)   /etc/keys/swap.key  luks,key-slot=1\n">>/etc/crypttab
root@debian:/# printf "crypt_data  UUID=$(blkid -o value -s UUID ${DEVY}1)   /etc/keys/data.key  luks,key-slot=1\n">>/etc/crypttab
# <target name> <source device>   <key file>          <options>
crypt_root UUID=DEV_SDX3_UUID     none                luks
crypt_swap UUID=DEV_SDX4_UUID     /etc/keys/swap.key  luks,key-slot=1
crypt_data UUID=DEV_SDY1_UUID     /etc/keys/data.key  luks,key-slot=1
zum anderen werden diese Laufwerke dann in die Datei /etc/fstab eingetragen. Hier werden die eigentlichen Dateisysteme definiert.
root@debian:/# printf "# /etc/fstab: static file system information.\n">/etc/fstab
root@debian:/# printf "#\n">>/etc/fstab
root@debian:/# printf "# file system           mount point  type  options            dump  pass\n">>/etc/fstab
root@debian:/# printf "proc                   /proc        proc  defaults           0     0\n">>/etc/fstab
root@debian:/# printf "/dev/disk/by-uuid/$(blkid -o value -s UUID ${DEVX}2)  /boot        ext4  errors=remount-ro  0     2\n">>/etc/fstab
root@debian:/# printf "/dev/mapper/crypt_root  /            ext4  errors=remount-ro  0     1\n">>/etc/fstab
root@debian:/# printf "/dev/mapper/crypt_data  /data        ext4  errors=remount-ro  0     2\n">>/etc/fstab
root@debian:/# printf "/dev/mapper/crypt_swap  none         swap  sw                 0     0\n">>/etc/fstab
# /etc/fstab: static file system information.
#
# file system           mount point  type  options            dump  pass
proc                    /proc        proc  defaults           0     0
/dev/disk/by-uuid/DEV_SDX2_UUID  /boot        ext4  errors=remount-ro  0     2
/dev/mapper/crypt_root  /            ext4  errors=remount-ro  0     1
/dev/mapper/crypt_data  /data        ext4  errors=remount-ro  0     2
/dev/mapper/crypt_swap  none         swap  sw                 0     0
u
Nun noch folgende notwendigen mounts in die mtab eintragen. Dazu wird einfach ein Symlink erstellt.
root@debian:/# ln -sf /proc/mounts /etc/mtab
3.6.8. Netzwerk einrichten
Als nächstes wird die Netzwerk-Konfiguration in zwei Dateien unter /etc/network/interfaces.d angepasst
root@debian:/# printf "auto lo\n">/etc/network/interfaces.d/loopback
root@debian:/# printf "iface lo inet loopback\n">>/etc/network/interfaces.d/loopback
auto lo
iface lo inet loopback
Mit systemd/udev v197 wurden die "Predictable Network Interface Names" eingefuehrt. War es bei Debian 8 (Jessie) noch ein opt-in und musste bewusst aktiviert werden, ist es seid Debian 9 (Stretch) default. Um den Namen des Netwerkadapters zu bekommen, wird der Befehl ip verwendet.
root@debian:/# ip link show
1: lo: <LOOPBACK,UP,LOWER_UP> mtu 65536 qdisc noqueue state UNKNOWN mode DEFAULT group default qlen 1000
    link/loopback 00:00:00:00:00:00 brd 00:00:00:00:00:00
2: enp0s3: <BROADCAST,MULTICAST,UP,LOWER_UP> mtu 1500 qdisc pfifo_fast state UP mode DEFAULT group default qlen 1000 (1)
    link/ether 08:00:27:e6:5b:6f brd ff:ff:ff:ff:ff:ff
| 1 | In diesem Fall ist die Ethernetkarte enp0s3 benannt worden. |
root@debian:/# INTERFACE=enp0s3
root@debian:/# printf "auto ${INTERFACE}\n">/etc/network/interfaces.d/${INTERFACE}
root@debian:/# printf "allow-hotplug ${INTERFACE}\n">>/etc/network/interfaces.d/${INTERFACE}
root@debian:/# printf "iface ${INTERFACE} inet dhcp\n">>/etc/network/interfaces.d/${INTERFACE}
auto enp0s3
allow-hotplug enp0s3
iface enp0s3 inet dhcp
Der Name des Servers wird in die Datei ./etc/hostname mittels
root@debian:/# echo MeinDebianServerName > /etc/hostname
MeinDebianServerName
und in die Datei ´/etc/hosts´ mittels einem Editor eingetragen.
root@debian:/# sed -i 's/localhost/& MeinDebianServerName/g' /etc/hosts
127.0.0.1       localhost MeinDebianServerName
::1             localhost MeinDebianServerName ip6-localhost MeinDebianServerName ip6-loopback
ff02::1         ip6-allnodes
ff02::2         ip6-allrouters
3.6.9. Bootloader Grub einrichten
Jetzt wird der passende Kernel installiert. Mit dem Befehl
root@debian:/# apt search linux-image
wird eine Liste mit Kernel-Images angezeigt und dann kann der passende Kernel installiert werden:
root@debian:/# apt install -y linux-image-amd64
Anschließend wird der Bootloader GRUB2 installiert,
root@debian:/# apt install -y grub-pc
root@debian:/# echo "GRUB_ENABLE_CRYPTODISK=y" >>/etc/default/grub
root@debian:/# grub-install ${DEVX}
das Init-Filesystem aktualisiert und Grub aktualisiert:
root@debian:/# update-initramfs -u -k all
root@debian:/# update-grub
3.7. System Reboot vorbereiten
Bevor das System neu gestartet werden kann, muss die Möglichkeit geschaffen werden, die Passphrase zum Entschlüsseln der Laufwerke während des Bootvorgangs via SSH einzugeben.
Außerdem muss noch der Zugang mit SSH konfiguriert werden, so dass der Server auch ohne physischen Zugriff erreichbar ist.
3.7.1. Dropbear installieren
Für die Eingabe der Passphrase während des Bootvorgangs kommt der kleine SSH-Server Dropbear zum Einsatz.
root@debian:/# apt install -y dropbear-initramfs
Während der Einrichtung werden die Host-SSH-Schlüssel generiert
[...]
Generating Dropbear RSA host key.  Please wait.
Generating 2048 bit rsa key, this may take a while...
2048 SHA256:Ym6vGbm/seXrzAB4WYe4BPuKZs8gsSkmZ8k2y9lZsZQ /etc/dropbear-initramfs/dropbear_rsa_host_key (RSA)
+---[RSA 2048]----+
|    .            |
|     o . .       |
|    . o o .      |
|     + = .       |
|.   . E S        |
| = o * *         |
|*.% . B o .      |
|+O O + = O       |
|  + = +o=o*.     |
+----[SHA256]-----+
Generating Dropbear ECDSA host key.  Please wait.
Generating 256 bit ecdsa key, this may take a while...
256 SHA256:rHi4s3o3K7Ajzpr/ne64j8256v2mToCC2YZHXDBOGEM /etc/dropbear-initramfs/dropbear_ecdsa_host_key (ECDSA)
+---[ECDSA 256]---+
|+E+..            |
|.= o             |
|  +              |
|.= .   .         |
|= = .   S        |
| +.  + .         |
|   oo +          |
|o.o +@oo.        |
|==o*X%/B.        |
+----[SHA256]-----+
Generating Dropbear ED25519 host key.  Please wait.
Generating 256 bit ed25519 key, this may take a while...
256 SHA256:Yv5o2LqkGQ0g8Mz80R8s8qINTjh0LQmsst0xLptzucs /etc/dropbear-initramfs/dropbear_ed25519_host_key (ED25519)
+--[ED25519 256]--+
|o.               |
|.*. o. .         |
|+.=+o.o o        |
|=o..++ o .       |
|+o+ooo+ S        |
|.+o*o+ .         |
|  ++++.          |
|  +*+ oo         |
|  ooE*. .        |
+----[SHA256]-----+
[...]
Nach der Installation muss noch die Konfiguration angepasst werden.
root@debian:/# vi /etc/initramfs-tools/initramfs.conf
Um auf das Root-Filesystem zugreifen zu können, muss die IP-Adresse bekannt gemacht werden.
Dazu wird die Zeile IP= in der Datei eingefügt, siehe auch nfsroot.txt
IP=x.x.x.x:::255.255.255.0::enp0s3:off für eine statische, IP=dhcp für eine per DHCP dynamisch zugewiesene Adresse.
#
# DEVICE: ...
#
# Specify a specific network interface, like eth0
# Overridden by optional ip= bootarg
#
DEVICE=
IP=dhcp
Aus Sicherheitsgründen verlangt Dropbear in dieser Situation aber eine Anmeldung per Public-/Private-Key-Verfahren. Darauf wird während der ersten Einrichtung beim Installieren auch hingewiesen
dropbear: WARNING: Invalid authorized_keys file, SSH login to initramfs won't work!
Der öffentliche Schlüssel wird in der Datei /etc/dropbear-initramfs/authorized_keys gespeichert.
root@debian:/# vi /etc/dropbear-initramfs/authorized_keys
Anschließend wird das Init-Filesystem ein weiteres Mal aktualisiert.
root@debian:/# update-initramfs -u -k all
Auch hier können die Fingerprints der Host-Schlüssel noch einmal angezeigt werden, um diese beim Login prüfen zu können. Es wird hier zusätzlich auch der öffentliche Teil der Schlüssel mit ausgegeben.
root@debian:/# for keyfile in /etc/dropbear-initramfs/dropbear_*_host_key; do echo "${keyfile}:"; dropbearkey -y -f "${file}"; done
/etc/dropbear-initramfs/dropbear_ecdsa_host_key:
Public key portion is:
ecdsa-sha2-nistp256 AAAAE2VjZHNhLXNoYTItbmlzdHAyNTYAAAAIbmlzdHAyNTYAAABBBGoGwB08qFusFf18Xt1oth+uzuANLmhd4tEFyAQdDoU1NCYPdZK3aloo1PddSOXpajIsT6fW3F1n0dHz1k5fFv8= root@MeinDebianServerName
Fingerprint: sha1!! 07:98:5b:4a:c0:4d:1c:0c:66:c6:db:32:8d:e8:f6:d6:25:6a:8b:1c
/etc/dropbear-initramfs/dropbear_ed25519_host_key:
Public key portion is:
ssh-ed25519 AAAAC3NzaC1lZDI1NTE5AAAAIMTQQqO8m27zI9H2e28eLqdQkdYFKxL3ta2y1vU1dQ25 root@MeinDebianServerName
Fingerprint: sha1!! e2:60:04:a0:86:2b:98:27:05:89:6d:df:f7:28:d2:85:d2:d1:83:07
/etc/dropbear-initramfs/dropbear_rsa_host_key:
Public key portion is:
ssh-rsa AAAAB3NzaC1yc2EAAAADAQABAAABAQCXzmWWBaiM+zo0UCuLL1YbCbdzzB83llw0TA0FEVfi+qaCV1gZQxDHqFdu/MadHjhvS7mFrPBJCUZQyAFJYdgnLylFIsJizuQ+ZeMGJJBh46uNpKuczYBf/7PaAsxqS15HU8NoOrpj6dMtGBi+W/d1TrfltdsjSnZMC0i5x0AxmDOCBv02pEHT9XnP/EHaWxmbAqtmbK2vdMJbS93ZX5hl/xDoGPMCG7GwTc+4giwvqmq2hTZW9oyXrvc/tWTS5VIeL3EHRpvJ/QY9GRbiTLUbp9v39Hh1/6iAMC+zFDhsePjWweyZxFujg5sMArFqUrztAHrV4OMW8LSz74rrUTRF root@MeinDebianServerName
Fingerprint: sha1!! 57:30:66:27:e5:ca:3b:fe:46:8d:77:1d:43:9c:67:35:88:e5:be:b6
3.7.2. OpenSSH installieren
Jetzt wird noch OpenSSH installiert, so dass der Server auch nach dem booten mittels SSH über das Netzwerk erreicht werden kann.
root@debian:/# apt install -y openssh-server
3.8. System rebooten
Nun kann die chroot-Umgebung verlassen werden mit
root@debian:/# exit
und mit
user@debian:~$ sudo reboot
ein Neustart durchgeführt werden.
Jetzt sollte das System beim Booten nach der Passphrase für die verschlüsselte Root-Partition fragen und dann bis zum Login-Prompt starten.
4. Basissystem konfigurieren
Zu Beginn als User root einloggen, um einen normalen User anzulegen und sudo zu installieren.
4.1. nützliche Einstellungen
4.1.1. Root-Prompt ändern
Es kann der Bash Prompt z.B. rot eingefärbt werden, als Hinweis darauf, dass als root mit Vorsicht gearbeitet werden sollte.
Beispiel: root@MeinDebianServerName:/var/log/#
Dazu wird in die /root/.bashrc eine Zeile eingefügt
root@MeinDebianServer:/# printf "PS1='\${debian_chroot:+(\$debian_chroot)}\\\\[\\\\033[01;31m\\\\]\\\\u@\\\\h\\\\[\\\\033[00m\\\\]:\[\\\\033[01;34m\\\\]\\\\w\\\\[\\\\033[00m\\\\]\$ '\n">>~/.bashrc
[...]
PS1='${debian_chroot:+($debian_chroot)}\[\033[01;31m\]\u@\h\[\033[00m\]:\[\033[01;34m\]\w\[\033[00m\]$ '
4.1.2. Beep on Startup
Nach erfolgreichem Bootvorgang kann ein Ton abgespielt werden.
Zuerst muss dazu beep installiert und dann die Datei /etc/systemd/system/beep.service erstellt werden
root@MeinDebianServer:/# apt install -y beep
root@MeinDebianServer:/# printf "[Unit]\n">/etc/systemd/system/beep.service
root@MeinDebianServer:/# printf "Description=Beep on startup\n">>/etc/systemd/system/beep.service
root@MeinDebianServer:/# printf "After=multi-user.target\n">>/etc/systemd/system/beep.service
root@MeinDebianServer:/# printf "\n[Service]\n">>/etc/systemd/system/beep.service
root@MeinDebianServer:/# printf "ExecStart=/usr/bin/beep -l 100 -r 3 -f 500\n">>/etc/systemd/system/beep.service
root@MeinDebianServer:/# printf "\n[Install]\n">>/etc/systemd/system/beep.service
root@MeinDebianServer:/# printf "WantedBy=multi-user.target\n">>/etc/systemd/system/beep.service
[Unit]
Description=Beep on startup
After=multi-user.target

[Service]
ExecStart=/usr/bin/beep -l 100 -r 3 -f 500

[Install]
WantedBy=multi-user.target
Anschließend wird der service noch aktiviert mit
root@MeinDebianServer:/# systemctl daemon-reload
root@MeinDebianServer:/# systemctl enable beep.service
Der Befehl /usr/bin/beep -l 100 -r 3 -f 500 kann nach eigenen Vorlieben angepasst werden.
Hier zwei weitere Beispiele:
beep -f 900 -n -f 800 -n -f 1200 -r 2
beep -l 75 -f 3000 -n -l 75 -f 2000 -n -l 75 -f 1000 -n -l 75 -f 500
4.2. User anlegen
Aus Sicherheitsgründen sollte gleich ein User angelegt werden, da bei der Arbeit als root ein Fehler fatale Folgen haben kann.
root@MeinDebianServer:/# adduser user
4.3. sudo
Damit nicht mit dem User root gearbeitet werden muss, sollte sudo installiert werden. Damit kann man als normaler User Befehle als root ausführen.
root@MeinDebianServer:/# apt install -y sudo
4.3.1. User der Gruppe sudo hinzufügen
Es reicht, einen User der group sudo hinzuzufügen, damit dieser sudo verwenden darf:
root@MeinDebianServer:/# adduser user sudo
Jetzt sollte man sich wieder ausloggen und mit dem neu eingerichteten User anmelden.
4.3.2. Rootshell mit sudo
Falls doch einmal eine Root-Shell benötigt wird, ist das ebenfalls möglich. Eine interaktive Login-Shell wird durch folgenden Befehl geöffnet:
user@MeinDebianServer:~$ sudo -i

We trust you have received the usual lecture from the local System
Administrator. It usually boils down to these three things:

    #1) Respect the privacy of others.
    #2) Think before you type.
    #3) With great power comes great responsibility.

[sudo] password for user:
root@MeinDebianServerName:~$
5. Software installieren und konfigurieren
5.1. Goodies (optional)
5.1.1. bash-completion
bash-completion ist ein Paket, welches die Bedienung der Bash deutlich vereinfacht.
Es müssen Befehle nicht mehr vollständig getippt werden, sie werden nun, wie auch Verzeichnisse, durch einen Druck auf TAB vervollständigt.
bash-completion installieren
user@MeinDebianServer:~$ sudo apt install -y bash-completion
5.1.2. man
Manpages (nach dem Unix-Kommando man, was für englisch manual “Handbuch” steht) sind eine Sammlung von Hilfe- und Dokumentationsseiten unter Unix und verwandten Betriebssystemen. Sie werden mit den Kommandos man und whatis durchsucht sowie ausgegeben.
user@MeinDebianServer:~$ sudo apt install -y man
5.1.3. needrestart
Mit Jessie eingeführte Alternative für checkrestart. Nach einem System Update wird geprüft, ob Prozesse vorhanden sind, die im Speicher liegende alte Versionen von aktualisierten Paketen verwenden. Es erfolgt ein Hinweis, die entsprechenden Prozesse neu zu starten.
user@MeinDebianServer:~$  sudo needrestart
Scanning processes...
Scanning linux images...

Running kernel seems to be up-to-date.

No services need to be restarted.

No containers need to be restarted.

No user sessions are running outdated binaries.
user@MeinDebianServer:~$ sudo apt install -y needrestart
5.1.4. rsync
TODO: kurze Erklärung - evtl. Dependency von Backup
user@MeinDebianServer:~$ sudo apt install -y rsync
5.2. Firewall nftables
TODO: kurze Erklärung
#!/usr/sbin/nft -f

flush ruleset

table inet filter {
        chain input {
                type filter hook input priority 0; policy drop;

                # Allow traffic from established and related packets, drop invalid
                ct state vmap { established : accept, related : accept, invalid : drop }

                # Allow loopback traffic.
                iifname lo accept

                # Jump to chain according to layer 3 protocol using a verdict map
                #meta protocol vmap { ip : jump inbound_ipv4, ip6 : jump inbound_ipv6 }

                # Allow SSH on port TCP/22 and allow HTTP(S) TCP/80 and TCP/443
                # for IPv4 and IPv6.
                tcp dport { ssh, http, https, imap2, imaps, pop3, pop3s, submission, smtp } ct state new accept

                # ICMP: errors, pings
                ip protocol icmp icmp type { echo-request, echo-reply, destination-unreachable, time-exceeded, parameter-problem, router-solicitation, router-advertisement } accept

                # ICMPv6: errors, pings, routing
                ip6 nexthdr icmpv6 counter accept comment "accept all ICMP types"

                # Reject other packets
                ip protocol tcp reject with tcp reset
        }
        chain forward {
                type filter hook forward priority 0;
        }
        chain output {
                type filter hook output priority 0;
        }
}
systemctl enable nftables
systemctl start nftables
systemctl status nftables
5.3. Fail2ban
Damit das System gegen Brute-Force-Angriffe geschützt ist, wird Fail2ban installiert.
Dadurch wird bei zu vielen fehlerhaften Login-Versuchen von einer IP aus diese IP über Regeln in der Firewall nftables für eine gewisse Zeit ausgesperrt.
user@MeinDebianServer:~$ sudo apt install -y fail2ban
Bei Debian Bullseye wird die neuere Firewall nftables anstelle von iptables installiert. Quelle https://www.pro-linux.de/news/1/27510/debian-11-bullseye-setzt-ganz-auf-nftables-als-paketfilter.html, 2021-10-18
In der Konfigurationdatei /etc/fail2ban/jail.local können die Default-Einstellungen aus /etc/fail2ban/jail.conf überschrieben werden.
Da in den Config-Dateien von Fail2ban noch iptables verwendet wird, werden die notwendigen Anpassungen für nftables in /etc/fail2ban/jail.local eingetragen. Quelle: https://www.ruhnke.cloud/server/debian/fail2ban-von-iptables-zu-nftables/, 2021-10-18
|
Evtl. auch firewalld verwenden? |
Außerdem kann z.B. die Einstellung action geändert werden, so dass bei einer Sperrung eine E-Mail mit weiteren Infos gesendet wird.
Zusätzlich können, falls gewünscht, die Login-Versuche von ssh und dropbear wieder auf 3 beschränkt werden, da der Defaultwert bei den beiden auf 6 erhöht ist.
user@MeinDebianServer:~$ sudo sh -c 'printf "# Änderungen gegenüber den Standard-Einstellungen von Debian Bullseye\n" > /etc/fail2ban/jail.local'
user@MeinDebianServer:~$ sudo sh -c 'printf "\n" >> /etc/fail2ban/jail.local'
user@MeinDebianServer:~$ sudo sh -c 'printf "[DEFAULT]\n" >> /etc/fail2ban/jail.local'
user@MeinDebianServer:~$ sudo sh -c 'printf "# Umstellung auf nftables\n" >> /etc/fail2ban/jail.local'
user@MeinDebianServer:~$ sudo sh -c 'printf "banaction = nftables-multiport\n" >> /etc/fail2ban/jail.local'
user@MeinDebianServer:~$ sudo sh -c 'printf "banaction_allports = nftables-allports\n" >> /etc/fail2ban/jail.local'
user@MeinDebianServer:~$ sudo sh -c 'printf "\n" >> /etc/fail2ban/jail.local'
user@MeinDebianServer:~$ sudo sh -c 'printf "# Action soll auch gleich eine Mail senden\n" >> /etc/fail2ban/jail.local'
user@MeinDebianServer:~$ sudo sh -c 'printf "action = %%(action_mwl)s\n" >> /etc/fail2ban/jail.local'
user@MeinDebianServer:~$ sudo sh -c 'printf "\n" >> /etc/fail2ban/jail.local'
user@MeinDebianServer:~$ sudo sh -c 'printf "# IP-Adressen, die nicht gesperrt werden sollen\n" >> /etc/fail2ban/jail.local'
user@MeinDebianServer:~$ sudo sh -c 'printf "# ignoreip = x.x.x.x y.y.y.y z.z.z.z\n" >> /etc/fail2ban/jail.local'
user@MeinDebianServer:~$ sudo sh -c 'printf "\n" >> /etc/fail2ban/jail.local'
user@MeinDebianServer:~$ sudo sh -c 'printf "# Maximale Anzahl an Versuchen\n" >> /etc/fail2ban/jail.local'
user@MeinDebianServer:~$ sudo sh -c 'printf "maxretry = 3\n" >> /etc/fail2ban/jail.local'
user@MeinDebianServer:~$ sudo sh -c 'printf "\n" >> /etc/fail2ban/jail.local'
user@MeinDebianServer:~$ sudo sh -c 'printf "[recidive]\n" >> /etc/fail2ban/jail.local'
user@MeinDebianServer:~$ sudo sh -c 'printf "# Umstellung auf nftables\n" >> /etc/fail2ban/jail.local'
user@MeinDebianServer:~$ sudo sh -c 'printf "banaction = nftables-allports\n" >> /etc/fail2ban/jail.local'
user@MeinDebianServer:~$ sudo sh -c 'printf "\n" >> /etc/fail2ban/jail.local'
# Änderungen gegenüber den Standard-Einstellungen von Debian Bullseye

[DEFAULT]
# Umstellung auf nftables
banaction = nftables-multiport
banaction_allports = nftables-allports

# Action soll auch gleich eine Mail senden
action = %(action_mwl)s

# IP-Adressen, die nicht gesperrt werden sollen
# ignoreip = x.x.x.x y.y.y.y z.z.z.z

# Maximale Anzahl an Versuchen
maxretry = 3

[recidive]
# Umstellung auf nftables
banaction = nftables-allports
5.3.1. unban
Eine versehentlich gesperrte IP wird mittels dem unbanip -Befehl des fail2ban-client freigeschaltet.
user@MeinDebianServer:~$ sudo fail2ban-client set <JAIL> unbanip <IP>
Quelle: How to Unban an IP properly with Fail2Ban (serverfault.com)
5.3.2. IP-Blacklist
Mit diesem Jail für fail2ban werden Wiederholungstäter permanent (bzw. hier für ein Jahr) ausgesperrt. Sobald eine IP-Adresse innerhalb eines Jahres durch zehn Mal gesperrt wurde, wird sie für ein Jahr gesperrt.
Damit diese Sperren auch bei einem Neustart von fail2ban erhalten bleiben, werden die IP-Adressen in zwei Dateien (getrennt nach IPv4- und IPv6-Adressen) eingetragen. Diese Dateien werden dann beim Start von fail2ban eingelesen und die darin enthaltenen IP-Adressen werden wieder gesperrt.
Quelle: https://github.com/mitchellkrogza/Fail2Ban-Blacklist-JAIL-for-Repeat-Offenders-with-Perma-Extended-Banning, 2021-10-18
Die folgenden Konfigurationsdateien wurden gegnüber den Originalversionen an die neue Firewall nftables angepasst.
In action.d sind die Regeln zum Sperren und Entsperren definiert.
user@MeinDebianServer:~$ sudo sh -c 'printf "# /etc/fail2ban/action.d/blacklist.conf\n" > /etc/fail2ban/action.d/blacklist.conf'
user@MeinDebianServer:~$ sudo sh -c 'printf "#\n" >> /etc/fail2ban/action.d/blacklist.conf'
user@MeinDebianServer:~$ sudo sh -c 'printf "# fail2ban: Permanent blocking of repeat offenders\n" >> /etc/fail2ban/action.d/blacklist.conf'
user@MeinDebianServer:~$ sudo sh -c 'printf "# Author: Stefan Bohn <stefan.bohn@gmail.com>\n" >> /etc/fail2ban/action.d/blacklist.conf'
user@MeinDebianServer:~$ sudo sh -c 'printf "#\n" >> /etc/fail2ban/action.d/blacklist.conf'
user@MeinDebianServer:~$ sudo sh -c 'printf "# Based on: https://github.com/mitchellkrogza/Fail2Ban-Blacklist-JAIL-for-Repeat-Offenders-with-Perma-Extended-Banning\n" >> /etc/fail2ban/action.d/blacklist.conf'
user@MeinDebianServer:~$ sudo sh -c 'printf "#\n" >> /etc/fail2ban/action.d/blacklist.conf'
user@MeinDebianServer:~$ sudo sh -c 'printf "# Tested On: 0.11.2\n" >> /etc/fail2ban/action.d/blacklist.conf'
user@MeinDebianServer:~$ sudo sh -c 'printf "# Server: Debian Bullseye 11.0\n" >> /etc/fail2ban/action.d/blacklist.conf'
user@MeinDebianServer:~$ sudo sh -c 'printf "# Firewall: nftables\n" >> /etc/fail2ban/action.d/blacklist.conf'
user@MeinDebianServer:~$ sudo sh -c 'printf "#\n" >> /etc/fail2ban/action.d/blacklist.conf'
user@MeinDebianServer:~$ sudo sh -c 'printf "# requires:\n" >> /etc/fail2ban/action.d/blacklist.conf'
user@MeinDebianServer:~$ sudo sh -c 'printf "#    /etc/fail2ban/filter.d/blacklist.conf\n" >> /etc/fail2ban/action.d/blacklist.conf'
user@MeinDebianServer:~$ sudo sh -c 'printf "#    /etc/fail2ban/jail.d/blacklist.conf\n" >> /etc/fail2ban/action.d/blacklist.conf'
user@MeinDebianServer:~$ sudo sh -c 'printf "\n" >> /etc/fail2ban/action.d/blacklist.conf'
user@MeinDebianServer:~$ sudo sh -c 'printf "[INCLUDES]\n" >> /etc/fail2ban/action.d/blacklist.conf'
user@MeinDebianServer:~$ sudo sh -c 'printf "before = nftables.conf\n" >> /etc/fail2ban/action.d/blacklist.conf'
user@MeinDebianServer:~$ sudo sh -c 'printf "\n" >> /etc/fail2ban/action.d/blacklist.conf'
user@MeinDebianServer:~$ sudo sh -c 'printf "\n" >> /etc/fail2ban/action.d/blacklist.conf'
user@MeinDebianServer:~$ sudo sh -c 'printf "[Definition]\n" >> /etc/fail2ban/action.d/blacklist.conf'
user@MeinDebianServer:~$ sudo sh -c 'printf "# Option:  actionstart\n" >> /etc/fail2ban/action.d/blacklist.conf'
user@MeinDebianServer:~$ sudo sh -c 'printf "# Notes.:  command executed once at the start of Fail2Ban.\n" >> /etc/fail2ban/action.d/blacklist.conf'
user@MeinDebianServer:~$ sudo sh -c 'printf "# Values:  CMD\n" >> /etc/fail2ban/action.d/blacklist.conf'
user@MeinDebianServer:~$ sudo sh -c 'printf "#\n" >> /etc/fail2ban/action.d/blacklist.conf'
user@MeinDebianServer:~$ sudo sh -c 'printf "actionstart = <nftables> add table <table_family> <table>\n" >> /etc/fail2ban/action.d/blacklist.conf'
user@MeinDebianServer:~$ sudo sh -c 'printf "              <nftables> -- add chain <table_family> <table> <chain> \{ type <chain_type> hook <chain_hook> priority <chain_priority> \; \}\n" >> /etc/fail2ban/action.d/blacklist.conf'
user@MeinDebianServer:~$ sudo sh -c 'printf "              %%(_nft_add_set)s\n" >> /etc/fail2ban/action.d/blacklist.conf'
user@MeinDebianServer:~$ sudo sh -c 'printf "              # Sort IPs in the ip.blacklist-<addr_set> file and remove duplicates\n" >> /etc/fail2ban/action.d/blacklist.conf'
user@MeinDebianServer:~$ sudo sh -c 'printf "              sort --field-separator=\. -k1,1 -k2,2 -k3,3 -k4,4 -n -u /etc/fail2ban/ip.blacklist-<addr_set> -o /etc/fail2ban/ip.blacklist-<addr_set>\n" >> /etc/fail2ban/action.d/blacklist.conf'
user@MeinDebianServer:~$ sudo sh -c 'printf "              # Persistent banning of IPs reading them from the ip.blacklist-<addr_set> file\n" >> /etc/fail2ban/action.d/blacklist.conf'
user@MeinDebianServer:~$ sudo sh -c 'printf "              # and adding them to nftables on the jail startup command\n" >> /etc/fail2ban/action.d/blacklist.conf'
user@MeinDebianServer:~$ sudo sh -c 'printf "              cat /etc/fail2ban/ip.blacklist-<addr_set> | awk '\''{print \$1}'\'' | while read IP; do\n" >> /etc/fail2ban/action.d/blacklist.conf'
user@MeinDebianServer:~$ sudo sh -c 'printf "                  <nftables> add element <table_family> <table> <addr_set> \{ \$IP \}\n" >> /etc/fail2ban/action.d/blacklist.conf'
user@MeinDebianServer:~$ sudo sh -c 'printf "              done\n"  >> /etc/fail2ban/action.d/blacklist.conf'
user@MeinDebianServer:~$ sudo sh -c 'printf "\n" >> /etc/fail2ban/action.d/blacklist.conf'
user@MeinDebianServer:~$ sudo sh -c 'printf "# Option:  actionban\n" >> /etc/fail2ban/action.d/blacklist.conf'
user@MeinDebianServer:~$ sudo sh -c 'printf "# Notes.:  command executed when banning an IP. Take care that the\n" >> /etc/fail2ban/action.d/blacklist.conf'
user@MeinDebianServer:~$ sudo sh -c 'printf "#          command is executed with Fail2Ban user rights.\n" >> /etc/fail2ban/action.d/blacklist.conf'
user@MeinDebianServer:~$ sudo sh -c 'printf "# Tags:    See jail.conf(5) man page\n" >> /etc/fail2ban/action.d/blacklist.conf'
user@MeinDebianServer:~$ sudo sh -c 'printf "# Values:  CMD\n" >> /etc/fail2ban/action.d/blacklist.conf'
user@MeinDebianServer:~$ sudo sh -c 'printf "#\n" >> /etc/fail2ban/action.d/blacklist.conf'
user@MeinDebianServer:~$ sudo sh -c 'printf "actionban = <nftables> add element <table_family> <table> <addr_set> \{ <ip> \}\n" >> /etc/fail2ban/action.d/blacklist.conf'
user@MeinDebianServer:~$ sudo sh -c 'printf "            # Add the new IP ban to our ip.blacklist file\n" >> /etc/fail2ban/action.d/blacklist.conf'
user@MeinDebianServer:~$ sudo sh -c 'printf "            echo \"<ip> - \$(date '\''+%%%%Y-%%%%m-%%%%d %%%%H:%%%%M:%%%%S'\'')\" >> /etc/fail2ban/ip.blacklist-<addr_set>\n"  >> /etc/fail2ban/action.d/blacklist.conf'
user@MeinDebianServer:~$ sudo sh -c 'printf "\n" >> /etc/fail2ban/action.d/blacklist.conf'
user@MeinDebianServer:~$ sudo sh -c 'printf "# Option:  actionunban\n" >> /etc/fail2ban/action.d/blacklist.conf'
user@MeinDebianServer:~$ sudo sh -c 'printf "# Notes.:  command executed when unbanning an IP. Take care that the\n" >> /etc/fail2ban/action.d/blacklist.conf'
user@MeinDebianServer:~$ sudo sh -c 'printf "#          command is executed with Fail2Ban user rights.\n" >> /etc/fail2ban/action.d/blacklist.conf'
user@MeinDebianServer:~$ sudo sh -c 'printf "# Tags:    See jail.conf(5) man page\n" >> /etc/fail2ban/action.d/blacklist.conf'
user@MeinDebianServer:~$ sudo sh -c 'printf "# Values:  CMD\n" >> /etc/fail2ban/action.d/blacklist.conf'
user@MeinDebianServer:~$ sudo sh -c 'printf "#\n" >> /etc/fail2ban/action.d/blacklist.conf'
user@MeinDebianServer:~$ sudo sh -c 'printf "actionunban = <nftables> delete element <table_family> <table> <addr_set> \{ <ip> \}\n" >> /etc/fail2ban/action.d/blacklist.conf'
user@MeinDebianServer:~$ sudo sh -c 'printf "              # Remove IP from our ip.blacklist file\n" >> /etc/fail2ban/action.d/blacklist.conf'
user@MeinDebianServer:~$ sudo sh -c 'printf "              sed -i -e '\''/<ip>/d'\'' /etc/fail2ban/ip.blacklist-<addr_set>\n" >> /etc/fail2ban/action.d/blacklist.conf'
user@MeinDebianServer:~$ sudo sh -c 'printf "\n" >> /etc/fail2ban/action.d/blacklist.conf'
user@MeinDebianServer:~$ sudo sh -c 'printf "[Init]\n" >> /etc/fail2ban/action.d/blacklist.conf'
# /etc/fail2ban/action.d/blacklist.conf
#
# fail2ban: Permanent blocking of repeat offenders
# Author: Stefan Bohn <stefan.bohn@gmail.com>
#
# Based on: https://github.com/mitchellkrogza/Fail2Ban-Blacklist-JAIL-for-Repeat-Offenders-with-Perma-Extended-Banning
#
# Tested On: 0.11.2
# Server: Debian Bullseye 11.0
# Firewall: nftables
#
# requires:
#    /etc/fail2ban/filter.d/blacklist.conf
#    /etc/fail2ban/jail.d/blacklist.conf

[INCLUDES]
before = nftables.conf


[Definition]
# Option:  actionstart
# Notes.:  command executed once at the start of Fail2Ban.
# Values:  CMD
#
actionstart = <nftables> add table <table_family> <table>
              <nftables> -- add chain <table_family> <table> <chain> \{ type <chain_type> hook <chain_hook> priority <chain_priority> \; \}
              %(_nft_add_set)s
              # Sort IPs in the ip.blacklist-<addr_set> file and remove duplicates
              sort --field-separator=\. -k1,1 -k2,2 -k3,3 -k4,4 -n -u /etc/fail2ban/ip.blacklist-<addr_set> -o /etc/fail2ban/ip.blacklist-<addr_set>
              # Persistent banning of IPs reading them from the ip.blacklist-<addr_set> file
              # and adding them to nftables on the jail startup command
              cat /etc/fail2ban/ip.blacklist-<addr_set> | awk '{print $1}' | while read IP; do
                  <nftables> add element <table_family> <table> <addr_set> \{ $IP \}
                  echo "$IP aus /etc/fail2ban/ip.blacklist-<addr_set>" >> /var/log/fail2ban-blacklist.log
              done

# Option:  actionban
# Notes.:  command executed when banning an IP. Take care that the
#          command is executed with Fail2Ban user rights.
# Tags:    See jail.conf(5) man page
# Values:  CMD
#
actionban = <nftables> add element <table_family> <table> <addr_set> \{ <ip> \}
            # Add the new IP ban to our ip.blacklist file
            echo "<ip> - $(date '+%%Y-%%m-%%d %%H:%%M:%%S')" >> /etc/fail2ban/ip.blacklist-<addr_set>

# Option:  actionunban
# Notes.:  command executed when unbanning an IP. Take care that the
#          command is executed with Fail2Ban user rights.
# Tags:    See jail.conf(5) man page
# Values:  CMD
#
actionunban = <nftables> delete element <table_family> <table> <addr_set> \{ <ip> \}
              # Remove IP from our ip.blacklist file
              sed -i -e '/<ip>/d' /etc/fail2ban/ip.blacklist-<addr_set>

[Init]
In filter.d ist der reguläre Ausdruck definiert, mittels dem fail2ban im Logfile sucht.
user@MeinDebianServer:~$ sudo sh -c 'printf "# /etc/fail2ban/filter.d/blacklist.conf\n" > /etc/fail2ban/filter.d/blacklist.conf'
user@MeinDebianServer:~$ sudo sh -c 'printf "#\n" >> /etc/fail2ban/filter.d/blacklist.conf'
user@MeinDebianServer:~$ sudo sh -c 'printf "# fail2ban: Permanent blocking of repeat offenders\n" >> /etc/fail2ban/filter.d/blacklist.conf'
user@MeinDebianServer:~$ sudo sh -c 'printf "# Author: Stefan Bohn <stefan.bohn@gmail.com>\n" >> /etc/fail2ban/filter.d/blacklist.conf'
user@MeinDebianServer:~$ sudo sh -c 'printf "#\n" >> /etc/fail2ban/filter.d/blacklist.conf'
user@MeinDebianServer:~$ sudo sh -c 'printf "# Based on: https://github.com/mitchellkrogza/Fail2Ban-Blacklist-JAIL-for-Repeat-Offenders-with-Perma-Extended-Banning\n" >> /etc/fail2ban/filter.d/blacklist.conf'
user@MeinDebianServer:~$ sudo sh -c 'printf "#\n" >> /etc/fail2ban/filter.d/blacklist.conf'
user@MeinDebianServer:~$ sudo sh -c 'printf "# Tested On: 0.11.2\n" >> /etc/fail2ban/filter.d/blacklist.conf'
user@MeinDebianServer:~$ sudo sh -c 'printf "# Server: Debian Bullseye 11.0\n" >> /etc/fail2ban/filter.d/blacklist.conf'
user@MeinDebianServer:~$ sudo sh -c 'printf "# Firewall: nftables\n" >> /etc/fail2ban/filter.d/blacklist.conf'
user@MeinDebianServer:~$ sudo sh -c 'printf "#\n" >> /etc/fail2ban/filter.d/blacklist.conf'
user@MeinDebianServer:~$ sudo sh -c 'printf "# requires:\n" >> /etc/fail2ban/filter.d/blacklist.conf'
user@MeinDebianServer:~$ sudo sh -c 'printf "#    /etc/fail2ban/action.d/blacklist.conf\n" >> /etc/fail2ban/filter.d/blacklist.conf'
user@MeinDebianServer:~$ sudo sh -c 'printf "#    /etc/fail2ban/jail.d/blacklist.conf\n" >> /etc/fail2ban/filter.d/blacklist.conf'
user@MeinDebianServer:~$ sudo sh -c 'printf "\n" >> /etc/fail2ban/filter.d/blacklist.conf'
user@MeinDebianServer:~$ sudo sh -c 'printf "[INCLUDES]\n" >> /etc/fail2ban/filter.d/blacklist.conf'
user@MeinDebianServer:~$ sudo sh -c 'printf "before = common.conf\n" >> /etc/fail2ban/filter.d/blacklist.conf'
user@MeinDebianServer:~$ sudo sh -c 'printf "\n" >> /etc/fail2ban/filter.d/blacklist.conf'
user@MeinDebianServer:~$ sudo sh -c 'printf "[Definition]\n" >> /etc/fail2ban/filter.d/blacklist.conf'
user@MeinDebianServer:~$ sudo sh -c 'printf "_daemon = fail2ban\.actions\s*\n" >> /etc/fail2ban/filter.d/blacklist.conf'
user@MeinDebianServer:~$ sudo sh -c 'printf "_jailname = blacklist\n" >> /etc/fail2ban/filter.d/blacklist.conf'
user@MeinDebianServer:~$ sudo sh -c 'printf "failregex = ^(%%(__prefix_line)s| %%(_daemon)s%%(__pid_re)s?:\s+)NOTICE\s+\[(?!%%(_jailname)s\])(?:.*)\]\s+Ban\s+<HOST>\s*\$\n" >> /etc/fail2ban/filter.d/blacklist.conf'
user@MeinDebianServer:~$ sudo sh -c 'printf "ignoreregex =\n" >> /etc/fail2ban/filter.d/blacklist.conf'
user@MeinDebianServer:~$ sudo sh -c 'printf "\n" >> /etc/fail2ban/filter.d/blacklist.conf'
user@MeinDebianServer:~$ sudo sh -c 'printf "[Init]\n" >> /etc/fail2ban/filter.d/blacklist.conf'
user@MeinDebianServer:~$ sudo sh -c 'printf "journalmatch = _SYSTEMD_UNIT=fail2ban.service PRIORITY=5\n" >> /etc/fail2ban/filter.d/blacklist.conf'
# /etc/fail2ban/filter.d/blacklist.conf
#
# fail2ban: Permanent blocking of repeat offenders
# Author: Stefan Bohn <stefan.bohn@gmail.com>
#
# Based on: https://github.com/mitchellkrogza/Fail2Ban-Blacklist-JAIL-for-Repeat-Offenders-with-Perma-Extended-Banning
#
# Tested On: 0.11.2
# Server: Debian Bullseye 11.0
# Firewall: nftables
#
# requires:
#    /etc/fail2ban/action.d/blacklist.conf
#    /etc/fail2ban/jail.d/blacklist.conf

[INCLUDES]
before = common.conf

[Definition]
_daemon = fail2ban\.actions\s*
_jailname = blacklist
failregex = ^(%(__prefix_line)s| %(_daemon)s%(__pid_re)s?:\s+)NOTICE\s+\[(?!%(_jailname)s\])(?:.*)\]\s+Ban\s+<HOST>\s*$
ignoreregex =

[Init]
journalmatch = _SYSTEMD_UNIT=fail2ban.service PRIORITY=5
In jail.d/blacklist.conf wird das Gefängnis definiert. Hier muss noch der Defaultwert action_ überschrieben werden, damit bereits beim Start und nicht erst beim ersten Ban actionstart ausgeführt wird (actionstart_on_demand=false).
user@MeinDebianServer:~$ sudo sh -c 'printf "# /etc/fail2ban/jail.d/blacklist.conf\n" > /etc/fail2ban/jail.d/blacklist.conf'
user@MeinDebianServer:~$ sudo sh -c 'printf "#\n" >> /etc/fail2ban/jail.d/blacklist.conf'
user@MeinDebianServer:~$ sudo sh -c 'printf "# fail2ban: Permanent blocking of repeat offenders\n" >> /etc/fail2ban/jail.d/blacklist.conf'
user@MeinDebianServer:~$ sudo sh -c 'printf "# Author: Stefan Bohn <stefan.bohn@gmail.com>\n" >> /etc/fail2ban/jail.d/blacklist.conf'
user@MeinDebianServer:~$ sudo sh -c 'printf "#\n" >> /etc/fail2ban/jail.d/blacklist.conf'
user@MeinDebianServer:~$ sudo sh -c 'printf "# Based on: https://github.com/mitchellkrogza/Fail2Ban-Blacklist-JAIL-for-Repeat-Offenders-with-Perma-Extended-Banning\n" >> /etc/fail2ban/jail.d/blacklist.conf'
user@MeinDebianServer:~$ sudo sh -c 'printf "#\n" >> /etc/fail2ban/jail.d/blacklist.conf'
user@MeinDebianServer:~$ sudo sh -c 'printf "# Tested On: 0.11.2\n" >> /etc/fail2ban/jail.d/blacklist.conf'
user@MeinDebianServer:~$ sudo sh -c 'printf "# Server: Debian Bullseye 11.0\n" >> /etc/fail2ban/jail.d/blacklist.conf'
user@MeinDebianServer:~$ sudo sh -c 'printf "# Firewall: nftables\n" >> /etc/fail2ban/jail.d/blacklist.conf'
user@MeinDebianServer:~$ sudo sh -c 'printf "#\n" >> /etc/fail2ban/jail.d/blacklist.conf'
user@MeinDebianServer:~$ sudo sh -c 'printf "# requires:\n" >> /etc/fail2ban/jail.d/blacklist.conf'
user@MeinDebianServer:~$ sudo sh -c 'printf "#    /etc/fail2ban/action.d/blacklist.conf\n" >> /etc/fail2ban/jail.d/blacklist.conf'
user@MeinDebianServer:~$ sudo sh -c 'printf "#    /etc/fail2ban/filter.d/blacklist.conf\n" >> /etc/fail2ban/jail.d/blacklist.conf'
user@MeinDebianServer:~$ sudo sh -c 'printf "\n" >> /etc/fail2ban/jail.d/blacklist.conf'
user@MeinDebianServer:~$ sudo sh -c 'printf "[blacklist]\n" >> /etc/fail2ban/jail.d/blacklist.conf'
user@MeinDebianServer:~$ sudo sh -c 'printf "enabled = true\n" >> /etc/fail2ban/jail.d/blacklist.conf'
user@MeinDebianServer:~$ sudo sh -c 'printf "action_ = %%(banaction)s[port=\"%%(port)s\", protocol=\"%%(protocol)s\", chain=\"%%(chain)s\", actionstart_on_demand=false]\n" >> /etc/fail2ban/jail.d/blacklist.conf'
user@MeinDebianServer:~$ sudo sh -c 'printf "logpath  = %%(blacklist_ip_log)s\n" >> /etc/fail2ban/jail.d/blacklist.conf'
user@MeinDebianServer:~$ sudo sh -c 'printf "port = 0:65535\n" >> /etc/fail2ban/jail.d/blacklist.conf'
user@MeinDebianServer:~$ sudo sh -c 'printf "filter = blacklist\n" >> /etc/fail2ban/jail.d/blacklist.conf'
user@MeinDebianServer:~$ sudo sh -c 'printf "banaction = blacklist\n" >> /etc/fail2ban/jail.d/blacklist.conf'
user@MeinDebianServer:~$ sudo sh -c 'printf "bantime  = 31536000   ; 1 year\n" >> /etc/fail2ban/jail.d/blacklist.conf'
user@MeinDebianServer:~$ sudo sh -c 'printf "findtime = 31536000   ; 1 year\n" >> /etc/fail2ban/jail.d/blacklist.conf'
user@MeinDebianServer:~$ sudo sh -c 'printf "maxretry = 10\n" >> /etc/fail2ban/jail.d/blacklist.conf'
# /etc/fail2ban/jail.d/blacklist.conf
#
# fail2ban: Permanent blocking of repeat offenders
# Author: Stefan Bohn <stefan.bohn@gmail.com>
#
# Based on: https://github.com/mitchellkrogza/Fail2Ban-Blacklist-JAIL-for-Repeat-Offenders-with-Perma-Extended-Banning
#
# Tested On: 0.11.2
# Server: Debian Bullseye 11.0
# Firewall: nftables
#
# requires:
#    /etc/fail2ban/action.d/blacklist.conf
#    /etc/fail2ban/filter.d/blacklist.conf

[blacklist]
enabled = true
action_ = %(banaction)s[port="%(port)s", protocol="%(protocol)s", chain="%(chain)s", actionstart_on_demand=false]
logpath  = %(blacklist_ip_log)s
port = 0:65535
filter = blacklist
banaction = blacklist
bantime  = 31536000   ; 1 year
findtime = 31536000   ; 1 year
maxretry = 10
Gemäß den Konventionen wird der Pfad zur Logdatei als Variable in /etc/fail2ban/paths-debian.local definiert
user@MeinDebianServer:~$ sudo sh -c 'printf "[DEFAULT]\n" > /etc/fail2ban/paths-debian.local'
user@MeinDebianServer:~$ sudo sh -c 'printf "blacklist_ip_log = /var/log/fail2ban.*\n" >> /etc/fail2ban/paths-debian.local'
user@MeinDebianServer:~$ sudo sh -c 'printf "\n" >> /etc/fail2ban/paths-debian.local'
[DEFAULT]
blacklist_ip_log = /var/log/fail2ban.*
Ein restart von fail2ban sorgt dafür, dass das neue Jail aktiviert wird.
user@MeinDebianServer:~$ sudo systemctl restart fail2ban.service
Damit auch ein ganzes Jahr überprüft werden kann, muss die Regel für /var/log/fail2ban.log in logrotate angepasst werden.
user@MeinDebianServer:~$ sudo sh -c 'printf "/var/log/fail2ban.log {\n" > /etc/logrotate.d/fail2ban'
user@MeinDebianServer:~$ sudo sh -c 'printf "\n" >> /etc/logrotate.d/fail2ban'
user@MeinDebianServer:~$ sudo sh -c 'printf "    monthly\n" >> /etc/logrotate.d/fail2ban'
user@MeinDebianServer:~$ sudo sh -c 'printf "    rotate 13\n" >> /etc/logrotate.d/fail2ban'
user@MeinDebianServer:~$ sudo sh -c 'printf "    # Do not rotate if empty\n" >> /etc/logrotate.d/fail2ban'
user@MeinDebianServer:~$ sudo sh -c 'printf "    notifempty\n" >> /etc/logrotate.d/fail2ban'
user@MeinDebianServer:~$ sudo sh -c 'printf "\n" >> /etc/logrotate.d/fail2ban'
user@MeinDebianServer:~$ sudo sh -c 'printf "    delaycompress\n" >> /etc/logrotate.d/fail2ban'
user@MeinDebianServer:~$ sudo sh -c 'printf "    missingok\n" >> /etc/logrotate.d/fail2ban'
user@MeinDebianServer:~$ sudo sh -c 'printf "    postrotate\n" >> /etc/logrotate.d/fail2ban'
user@MeinDebianServer:~$ sudo sh -c 'printf "        fail2ban-client flushlogs 1>/dev/null\n" >> /etc/logrotate.d/fail2ban'
user@MeinDebianServer:~$ sudo sh -c 'printf "    endscript\n" >> /etc/logrotate.d/fail2ban'
user@MeinDebianServer:~$ sudo sh -c 'printf "\n" >> /etc/logrotate.d/fail2ban'
user@MeinDebianServer:~$ sudo sh -c 'printf "    # If fail2ban runs as non-root it still needs to have write access\n" >> /etc/logrotate.d/fail2ban'
user@MeinDebianServer:~$ sudo sh -c 'printf "    # to logfiles.\n" >> /etc/logrotate.d/fail2ban'
user@MeinDebianServer:~$ sudo sh -c 'printf "    # create 640 fail2ban adm\n" >> /etc/logrotate.d/fail2ban'
user@MeinDebianServer:~$ sudo sh -c 'printf "    create 640 root adm\n" >> /etc/logrotate.d/fail2ban'
user@MeinDebianServer:~$ sudo sh -c 'printf "}\n" >> /etc/logrotate.d/fail2ban'
/var/log/fail2ban.log {

    monthly
    rotate 13
    # Do not rotate if empty
    notifempty

    delaycompress
    missingok
    postrotate
        fail2ban-client flushlogs 1>/dev/null
    endscript

    # If fail2ban runs as non-root it still needs to have write access
    # to logfiles.
    # create 640 fail2ban adm
    create 640 root adm
}
Anschließend muss auch logrotate neu gestartet werden
user@MeinDebianServer:~$ sudo systemctl restart logrotate.service
Geblockte IP-Adressen werden dann mit Datum in der Datei /etc/fail2ban/ip.blacklist-addr-set-blacklist (für IPv4) bzw. /etc/fail2ban/ip.blacklist-addr6-set-blacklist (für IPv6) gespeichert. Diese Dateien werden dann beim Neustart des Rechners oder des fail2ban.service eingelesen und die enthaltenen IPs werden gleich wieder gesperrt.
212.70.149.54 - 2020-12-28 09:22:49
212.70.149.70 - 2020-12-19 08:36:13
212.70.149.71 - 2021-02-08 08:31:11
212.70.149.113 - 2021-04-08 16:34:34
212.70.149.114 - 2021-04-04 08:36:20
212.192.241.216 - 2021-06-15 10:04:105.4. Samba
Damit Daten auch auf dem Server gespeichert werden können, ist ein Netzwerk-Dateisystem notwendig. Das unter Linux eingesetzte NFS ist nicht für Windows-Clients geeignet. Microsoft hat das SMB-Protokoll entwicklelt, welches unter Linux durch Samba bereit gestellt wird.
Damit Windows-Clients den Server also als Fileserver verwenden können, wird Samba installiert.
user@MeinDebianServer:~$ sudo apt install -y samba
|
TODO: Group prüfen Setting up samba-common-bin (2:4.13.5+dfsg-2) ... Checking smb.conf with testparm Load smb config files from /etc/samba/smb.conf Loaded services file OK. Weak crypto is allowed WARNING: The 'netbios name' is too long (max. 15 chars). Server role: ROLE_STANDALONE Done Setting up samba (2:4.13.5+dfsg-2) ... Adding group `sambashare' (GID 113) ... Done. Samba is not being run as an AD Domain Controller: Masking samba-ad-dc.service Please ignore the following error about deb-systemd-helper not finding those services. (samba-ad-dc.service masked) Created symlink /etc/systemd/system/multi-user.target.wants/nmbd.service → /lib/systemd/system/nmbd.service. Failed to preset unit: Unit file /etc/systemd/system/samba-ad-dc.service is masked. /usr/bin/deb-systemd-helper: error: systemctl preset failed on samba-ad-dc.service: No such file or directory Created symlink /etc/systemd/system/multi-user.target.wants/smbd.service → /lib/systemd/system/smbd.service. samba-ad-dc.service is a disabled or a static unit, not starting it. |
Um die Konfiguration anzupassen, wird die vom Paket mitgelieferte Konfigurationsdatei 'smb.conf' unter einem anderen Namen gesichert.
user@MeinDebianServer:~$ sudo cp /etc/samba/smb.conf /etc/samba/smb.conf_orig
Anschließend können die Einstellungen angepasst und ergänzt werden.
Im Abschnitt [global] werden die beiden Enträge
   workgroup = <ARBEITSGRUPPE>
   usershare allow guests = no
angepasst und die folgende Ergänzungen sollten eingetragen werden
| TODO: NetBIOS ist unsicher… Samba v1 deaktivieren in Windows, dann keine Namensaufllösung mehr. |
# Anpassungen Start
# Namensaufloesung mit NETBIOS
   name resolve order = bcast lmhosts host wins
   netbios name = RIVENDELL
   server string = Server Samba %v
# Security
   hosts allow = 127.0.0.1 192.168.0.0/24
   hosts deny = 0.0.0.0/0
   security = user
# Dateinamen
   unix extensions = no
   mangled names = no
   preserve case = yes
   case sensitive = no
# Logging aktivieren fuer Fail2ban wegen Crypto-Troyanern
# http://www.heise.de/security/artikel/Erpressungs-Trojaner-wie-Locky-aussperren-3120956.html
   full_audit:failure = none
   full_audit:success = pwrite write rename
   full_audit:prefix = IP=%I|USER=%u|MACHINE=%m|VOLUME=%S
   full_audit:facility = local7
   full_audit:priority = NOTICE
# Anpassungen Ende
Im Anbschnitt [homes] sind es folgende Einträge
   read only = no
   create mask = 0600
und
# Anpassungen Start
   follow symlinks = yes
   wide links = yes
# Logging aktivieren fuer Fail2ban wegen Crypto-Troyanern
   vfs objects = full_audit
# Anpassungen Ende
Nach diesem Abschnitt wird noch der Abschnitt [smball] ergänzt. Auf das Verzeichnis in diesem Abschnitt haben alle Samba-User Zugriff.
# Anpassungen Start
[smball]
   comment = smball
   path = /data/samba/groupsmball
   read only = no
   create mask = 0660
   directory mask = 770
   force directory mode = 2770
# Logging aktivieren fuer Fail2ban wegen Crypto-Troyanern
   vfs objects = full_audit
#
Die beiden Abschnitte [printers] und [print$] werden auskommentiert.
;[printers]
;  comment = All Printers
;  browseable = no
;  path = /var/spool/samba
;  printable = yes
;  guest ok = no
;  read only = yes
;  create mask = 0700

# Windows clients look for this share name as a source of downloadable
# printer drivers
;[print$]
;  comment = Printer Drivers
;  path = /var/lib/samba/printers
;  browseable = yes
;  read only = yes
;  guest ok = no
Zum einfacheren Vergleich der Einstellungen werden nun mit
user@MeinDebianServer:~$ sudo grep -v -E "#|;" /etc/samba/smb.conf | grep .
nur die aktiven Einstellungen ausgegeben.
[global]
   workgroup = BOHN
   dns proxy = no
   log file = /var/log/samba/log.%m
   max log size = 1000
   syslog = 0
   panic action = /usr/share/samba/panic-action %d
   server role = standalone server
   passdb backend = tdbsam
   obey pam restrictions = yes
   unix password sync = yes
   passwd program = /usr/bin/passwd %u
   passwd chat = *Enter\snew\s*\spassword:* %n\n *Retype\snew\s*\spassword:* %n\n *password\supdated\ssuccessfully* .
   pam password change = yes
   map to guest = bad user
   usershare allow guests = no
   name resolve order = bcast lmhosts host wins
   netbios name = RIVENDELL
   server string = Server Samba %v
   hosts allow = 127.0.0.1 192.168.0.0/24
   hosts deny = 0.0.0.0/0
   security = user
   unix extensions = no
   mangled names = no
   preserve case = yes
   case sensitive = no
   full_audit:failure = none
   full_audit:success = pwrite write rename
   full_audit:prefix = IP=%I|USER=%u|MACHINE=%m|VOLUME=%S
   full_audit:facility = local7
   full_audit:priority = NOTICE
[homes]
   comment = Home Directories
   browseable = no
   read only = no
   create mask = 0600
   directory mask = 0700
   valid users = %S
   follow symlinks = yes
   wide links = yes
   vfs objects = full_audit
[smball]
   comment = smball
   path = /data/samba/groupsmball
   read only = no
   create mask = 0660
   directory mask = 770
   force directory mode = 2770
   vfs objects = full_audit
5.4.1. User für Samba zulassen
Damit der User auch Zugriff auf Samba bekommt, muss noch ein Passwort für user vergeben werden. Ohne diesen Schritt werden die Verzeichnisse zwar angezeigt, der User darf aber nicht darauf zugreifen.
user@MeinDebianServer:~$ sudo smbpasswd -a user
5.4.2. Gemeinsames Verzeichnis für alle Samba-User
Anschließend ein Verzeichnis anlegen, auf das alle Samba-User zugreifen können und entsprechende Filesystem-Rechte vergeben.
setgid auf das Verzeichnis bewirkt, dass alle angelegten Dateien der Gruppe des Verzeichnisses zugeordnet werden. Somit können alle User, die dieser Gruppe angehören, auch neu von anderen Usern angelegte Dateien verwenden.
user@MeinDebianServer:~$ sudo addgroup smball
user@MeinDebianServer:~$ sudo mkdir /home/groupsmball
user@MeinDebianServer:~$ sudo chown root:smball /home/groupsmball/
user@MeinDebianServer:~$ sudo chmod 2770 /home/groupsmball/
user@MeinDebianServer:~$ sudo usermod -G smball user
user@MeinDebianServer:~$ sudo systemctl restart smbd
5.4.3. Fail2ban
Damit ein Verschlüsselungstrojaner nicht die kompletten Samba-Freigaben von einem Client aus bearbeiten kann, wird ein Fail2ban-Filter definiert. Sobald eine Datei mit einer bekannten Datei-Endung erstellt oder umbenannt wird, wird der Client für 24 Stunden gesperrt. Dieser Tipp kommt von heise.de
Inzwischen gibt es ein Repository bei GitHub, welches eine ausführlichere Filterregel bereitstellt.
[Definition]

# Honeypot file regex. The files in the honeypot folder MUST match this regex
__honeypot_files_re=(-ShahZeZ6\.)

# Known ransomware extensions regex
__known_ransom_extensions_re=(\.k$|\.encoderpass$|\.key$|\.ecc$|\.ezz$|\.exx$|\.zzz$|\.xyz$|\.aaa$|\.abc$|\.ccc$|\.vvv$|\.xxx$|\.ttt$|\.micro$|\.encrypted$|\.locked$|\.crypto$|_crypt$|\.crinf$|\.r5a$|\.xrtn$|\.XTBL$|\.crypt$|\.R16M01D05$|\.pzdc$|\.good$|\.LOL\!$|\.OMG\!$|\.RDM$|\.RRK$|\.encryptedRSA$|\.crjoker$|\.EnCiPhErEd$|\.LeChiffre$|\.keybtc@inbox_com$|\.0x0$|\.bleep$|\.1999$|\.vault$|\.HA3$|\.toxcrypt$|\.magic$|\.SUPERCRYPT$|\.CTBL$|\.CTB2$|\.locky$|\.wnry$|\.wcry$|\.wncry$|\.wncryt$|\.uiwix$)
# Known ransomware files regex
__known_ransom_files_re=(HELPDECRYPT\.TXT$|HELP_YOUR_FILES\.TXT$|HELP_TO_DECRYPT_YOUR_FILES\.txt$|RECOVERY_KEY\.txt$|HELP_RESTORE_FILES\.txt$|HELP_RECOVER_FILES\.txt$|HELP_TO_SAVE_FILES\.txt$|DecryptAllFiles\.txt$|DECRYPT_INSTRUCTIONS\.TXT$|INSTRUCCIONES_DESCIFRADO\.TXT$|How_To_Recover_Files\.txt$|YOUR_FILES\.HTML$|YOUR_FILES\.url$|Help_Decrypt\.txt$|DECRYPT_INSTRUCTION\.TXT$|HOW_TO_DECRYPT_FILES\.TXT$|ReadDecryptFilesHere\.txt$|Coin\.Locker\.txt$|_secret_code\.txt$|About_Files\.txt$|Read\.txt$|ReadMe\.txt$|DECRYPT_ReadMe\.TXT$|DecryptAllFiles\.txt$|FILESAREGONE\.TXT$|IAMREADYTOPAY\.TXT$|HELLOTHERE\.TXT$|READTHISNOW\!\!\!\.TXT$|SECRETIDHERE\.KEY$|IHAVEYOURSECRET\.KEY$|SECRET\.KEY$|HELPDECYPRT_YOUR_FILES\.HTML$|help_decrypt_your_files\.html$|HELP_TO_SAVE_FILES\.txt$|RECOVERY_FILES\.txt$|RECOVERY_FILE\.TXT$|RECOVERY_FILE.*\.txt$|HowtoRESTORE_FILES\.txt$|HowtoRestore_FILES\.txt$|howto_recover_file\.txt$|restorefiles\.txt$|howrecover\+.*\.txt$|_how_recover\.txt$|recoveryfile.*\.txt$|recoverfile.*\.txt$|recoveryfile.*\.txt$|Howto_Restore_FILES\.TXT$|help_recover_instructions\+.*\.txt$|_Locky_recover_instructions\.txt$)

# Match on known ransomware regex or generic honeypot
failregex = smbd.*:\ IP=<HOST>\ .*%(__honeypot_files_re)s
      smbd.*:\ IP=<HOST>\ .*%(__known_ransom_extensions_re)s
smbd.*:\ IP=<HOST>\ .*%(__known_ransom_files_re)s[samba]
filter=samba-filter
enabled=true
action=iptables-multiport[name=samba,port="135,139,445,137,138",protocol=tcp]
mail[name=samba-ransomware,dest=root]
logpath=/var/log/syslog
maxretry=1
# Check the last 10 minutes
findtime=600
# Ban for 30 days
bantime=25920005.5. E-Mail
imapcopy
TODO: Genauer beschreiben
Bei meinem Server sollen die E-Mails nur per IMAP zur Verfügung gestellt werden. Versendet und Empfangen werden die Mails von anderen Accounts.
Fetchmail holt die Mails der Konten ab und reicht sie an Dovecot weiter. Dovecot stellt die Mails per IMAP zur Verfügung.
Gesendet werden die Mails über die Server der Accounts.
5.5.1. Dovecot
Dovecot soll die E-Mails via IMAP zur Verfügung stellen, so dass diese von verschiedenen Endgeräten aus abgerufen werden können.
user@MeinDebianServer:~$ sudo apt install -y dovecot-imapd dovecot-sieve
Wenn disable_plaintext_auth auf yes gesetzt wird, dann erlaubt dovecot nur dann Klartext-Passwörter, wenn eine verschlüsselte Verbindung vorhanden ist. Solange keine solche Verbindung eingerichtet ist, muss dieser Parameter auf no gestellt sein, damit eine Verbindung zu dovecot aufgebaut werden kann.
|
disable_plaintext_auth = yes
auth_mechanisms = plain
Wenn SSL-Zertifikate vorhanden sind, kann SSL aktiviert und der Pfad zu den Zertifikaten in der entsprechenden Konfigurationsdatei eingetragen werden.
ssl = required
ssl_cert = </path/to/cert.pem
ssl_key = </path/to/key.pem
Damit die Mails im Maildir-Format gespeichert werden, wird der ensprechende Parameter abgepasst. Außerdem wird noch eine Gruppe für Mails definiert.
mail_location = maildir:~/Maildir
mail_privileged_group = mail
Damit Fail2ban bei zu vielen fehlerhaften Logins auch den Zugriff sperren kann, wird das Logging entsprechend angepasst.
auth_verbose = yes
log_timestamp = "%Y-%m-%d %H:%M:%S "
|
TODO: Warum nochmal den Parameter |
imap_idle_notify_interval = 29 mins
Fail2ban
# Fail2Ban filter Dovecot authentication and pop3/imap server
#

[INCLUDES]

before = common.conf

[Definition]

_daemon = (auth|dovecot(-auth)?|auth-worker)

failregex = ^%(__prefix_line)s(?:%(__pam_auth)s(?:\(dovecot:auth\))?:)?\s+authentication failure; logname=\S* uid=\S* euid=\S* tty=dovecot ruser=\S* rhost=<HOST>(?:\s+user=\S*)?\s*$
            ^%(__prefix_line)s(?:pop3|imap)-login: (?:Info: )?(?:Aborted login|Disconnected)(?::(?: [^ \(]+)+)? \((?:auth failed, \d+ attempts( in \d+ secs)?|tried to use (disabled|disallowed) \S+ auth)\):( user=<[^>]+>,)?( method=\S+,)? rip=<HOST>(?:, lip=\S+)?(?:, TLS(?: handshaking(?:: SSL_accept\(\) failed: error:[\dA-F]+:SSL routines:[TLS\d]+_GET_CLIENT_HELLO:unknown protocol)?)?(: Disconnected)?)?(, session=<\S+>)?\s*$
            ^%(__prefix_line)s(?:Info|dovecot: auth\(default\)|auth-worker\(\d+\)): pam\(\S+,<HOST>\): pam_authenticate\(\) failed: (User not known to the underlying authentication module: \d+ Time\(s\)|Authentication failure \(password mismatch\?\))\s*$
            ^%(__prefix_line)s(?:auth|auth-worker\(\d+\)): (?:pam|passwd-file)\(\S+,<HOST>\): unknown user\s*$
            ^%(__prefix_line)s(?:auth|auth-worker\(\d+\)): Info: ldap\(\S*,<HOST>,\S*\): invalid credentials\s*$

ignoreregex =

[Init]

journalmatch = _SYSTEMD_UNIT=dovecot.service

# DEV Notes:
# * the first regex is essentially a copy of pam-generic.conf
# * Probably doesn't do dovecot sql/ldap backends properly (resolved in edit 21/03/2016)
# * Removed the 'no auth attempts' log lines from the matches because produces
#    lots of false positives on misconfigured MTAs making regexp unusable
#
# Author: Martin Waschbuesch
#         Daniel Black (rewrote with begin and end anchors)
#         Martin O'Neal (added LDAP authentication failure regex)
# Sergey G. Brester aka sebres (reviewed, optimized, IPv6-compatibility)# Fail2Ban configuration file for dovcot
#
# Author: Martin Waschbuesch
#
# $Revision$
#
[Definition]
# Option: failregex
# Notes.: regex to match the password failures messages in the logfile. The
# host must be matched by a group named "host". The tag "<HOST>" can
# be used for standard IP/hostname matching and is only an alias for
# (?:::f{4,6}:)?(?P<host>[\w\-.^_]+)
# Values: TEXT
#
# failregex = .*(?:pop3-login|imap-login):.*(?:Authentication failure|Aborted login \(auth failed|Aborted login \(tried to use disabled|Disconnected \(auth failed).*rip=(?P<host>\S*),.*
# Changed by Stefan Bohn
failregex = dovecot.*auth-worker.*pam\(.*,<HOST>\).*: pam_authenticate\(\) failed: Authentication failure
# Option: ignoreregex
# Notes.: regex to ignore. If this regex matches, the line is ignored.
# Values: TEXT
#
ignoreregex =
[dovecot]
enabled = true
5.5.2. Postfix
sudo apt install -y postfix
sudo vi /etc/postfix/main.cf
Einfügen von home_mailbox = Maildir/ wegen Maildir
# See /usr/share/postfix/main.cf.dist for a commented, more complete version


# Debian specific:  Specifying a file name will cause the first
# line of that file to be used as the name.  The Debian default
# is /etc/mailname.
#myorigin = /etc/mailname

smtpd_banner = $myhostname ESMTP $mail_name (Debian/GNU)
biff = no

# appending .domain is the MUA's job.
append_dot_mydomain = no

# Uncomment the next line to generate "delayed mail" warnings
#delay_warning_time = 4h

readme_directory = no

# See http://www.postfix.org/COMPATIBILITY_README.html -- default to 2 on
# fresh installs.
compatibility_level = 2


# TLS parameters
smtpd_tls_cert_file=/etc/ssl/certs/ssl-cert-snakeoil.pem
smtpd_tls_key_file=/etc/ssl/private/ssl-cert-snakeoil.key
smtpd_tls_security_level=may

smtp_tls_CApath=/etc/ssl/certs
smtp_tls_security_level=may
smtp_tls_session_cache_database = btree:${data_directory}/smtp_scache


smtpd_relay_restrictions = permit_mynetworks permit_sasl_authenticated defer_unauth_destination
myhostname = localhost.fritz.box
alias_maps = hash:/etc/aliases
alias_database = hash:/etc/aliases
myorigin = /etc/mailname
mydestination = $myhostname, localhost, localhost.localdomain, localhost
relayhost =
mynetworks = 127.0.0.0/8 [::ffff:127.0.0.0]/104 [::1]/128
mailbox_size_limit = 0
recipient_delimiter = +
inet_interfaces = loopback-only
default_transport = error
relay_transport = error
inet_protocols = all

home_mailbox = Maildir/
5.5.3. Exim4
Damit lokale Mails bei dovecot ankommen (z.B. von cronjobs)
user@MeinDebianServer:~$ sudo apt install -y exim4
Anpassen, damit die config aus den kleinen einzelnen Dateien erstellt wird
{prompt-user}dpkg-reconfigure exim4-config
-
Split configuration into small files? Yes
Anpassen
LOCAL_DELIVERY=maildir_home
transport = dovecot_delivery
Erstellen
dovecot_delivery:
  driver = pipe

  # Use /usr/lib/dovecot/dovecot-lda  if using Debian's package.
  # You may or may not want to add -d $local_part@$domain depending on if you need a userdb lookup done.
  command = /usr/lib/dovecot/dovecot-lda -f $sender_address

  message_prefix =
  message_suffix =
  log_output
  delivery_date_add
  envelope_to_add
  return_path_add
  #group = mail
  #mode = 0660
  temp_errors = 64 : 69 : 70: 71 : 72 : 73 : 74 : 75 : 78
Konfig erstellen (wird erstellt als //var/lib/exim4/config.autogenerated) und Service neu starten
user@MeinDebianServer:~$ sudo update-exim4.conf
user@MeinDebianServer:~$ sudo systemctl restart exim4.service
root Mails an user weiterleiten
user@localhost
5.5.4. Fetchmail
Fetchmail dient dazu, die E-Mails verschiedener Accounts abzurufen und dem lokalen Mail-Delivery-Agent zu geben. Hier wird das von dovecot übernommen.
user@MeinDebianServer:~$ sudo apt install -y fetchmail
# This file will be used to declare some vars for fetchmail
#
# Uncomment the following if you don't want localized log messages
# export LC_ALL=C

# If you want to specify any additional OPTION to the start
# scripts specify them here
# OPTIONS=...

# Declare here if we want to start fetchmail. 'yes' or 'no'
START_DAEMON=yes
set daemon 300
set syslog
set postmaster "user1"
set no bouncemail

defaults:
timeout 300
antispam -1
batchlimit 100

mda "HOME=/home/%T /usr/bin/sudo -u %T /usr/lib/dovecot/deliver"

poll mail.example.com protocol POP3 user "user1@examle.com" there with password "password" is user1 here nofetchall keep ssl
poll mail.example.com protocol POP3 user "user2@example.com" there with password "topsecret" is user2 here nofetchall keep ssl
Mit visudo diese Zeile ergänzen
# User privilege specification
[...]
fetchmail ALL=(ALL) NOPASSWD:/usr/lib/dovecot/deliver
5.5.5. Amavis
TODO: Installation und Setup genauer erklären, siehe Amavis
5.5.6. SpamAssasin
TODO: Installation und Setup genauer erklären, siehe SpamAssasin
5.6. Apache 2
Um im Internet Dienste anzubieten, wird der HTTP-Server Apache benötigt.
Zuerst wird das Paket installiert.
user@MeinDebianServer:~$ sudo apt install -y apache2
Anschließend werden noch die benötigten Module aktiviert
user@MeinDebianServer:~$ sudo a2enmod ssl
user@MeinDebianServer:~$ sudo a2enmod rewrite
user@MeinDebianServer:~$ sudo a2enmod proxy
user@MeinDebianServer:~$ sudo a2enmod headers
Danach kann geprüft werden, ob die Default-Website aufgerufen werden kann. Dazu in einem Browser einfach die Adresse http://<IP-Adresse> aufrufen. Wenn die Website angezeigt wird, kann diese nun deaktiviert werden und eine eigene Konfigdatei erstellt werden.
user@MeinDebianServer:~$ sudo a2dissite 000-default
5.7. PHP
user@MeinDebianServer:~$ sudo apt install -y php7.0
5.8. MariaDB /MySQL
user@MeinDebianServer:~$ sudo apt install -y mariadb-server
user@MeinDebianServer:~$ sudo mysql_secure_installation

NOTE: RUNNING ALL PARTS OF THIS SCRIPT IS RECOMMENDED FOR ALL MariaDB
      SERVERS IN PRODUCTION USE!  PLEASE READ EACH STEP CAREFULLY!

In order to log into MariaDB to secure it, we'll need the current
password for the root user.  If you've just installed MariaDB, and
you haven't set the root password yet, the password will be blank,
so you should just press enter here.

Enter current password for root (enter for none):
OK, successfully used password, moving on...

Setting the root password ensures that nobody can log into the MariaDB
root user without the proper authorisation.

Set root password? [Y/n] n (1)
 ... skipping.

By default, a MariaDB installation has an anonymous user, allowing anyone
to log into MariaDB without having to have a user account created for
them.  This is intended only for testing, and to make the installation
go a bit smoother.  You should remove them before moving into a
production environment.

Remove anonymous users? [Y/n]
 ... Success!

Normally, root should only be allowed to connect from 'localhost'.  This
ensures that someone cannot guess at the root password from the network.

Disallow root login remotely? [Y/n]
 ... Success!

By default, MariaDB comes with a database named 'test' that anyone can
access.  This is also intended only for testing, and should be removed
before moving into a production environment.

Remove test database and access to it? [Y/n]
 - Dropping test database...
 ... Success!
 - Removing privileges on test database...
 ... Success!

Reloading the privilege tables will ensure that all changes made so far
will take effect immediately.

Reload privilege tables now? [Y/n]
 ... Success!

Cleaning up...

All done!  If you've completed all of the above steps, your MariaDB
installation should now be secure.

Thanks for using MariaDB!
| 1 | Der MariaDB-Root-User in Debian ist besonders. Deswegen sollte, falls ein administrativer User mit Passwort benötigt wird, ein solcher angelegt werden: |
user@MeinDebianServer:~$ sudo mysql
MariaDB [(none)]> GRANT ALL ON . TO 'admin'@'localhost' IDENTIFIED BY 'password' WITH GRANT OPTION;
MariaDB [(none)]> FLUSH PRIVILEGES;
fe
6. Offene Punkte
6.2. let’s encrypt
Zertifikate erstellen
6.3. Amavis
Anbinden von Contentfiltern (Virenscanner, SpamAssasin, …) an den Mail Transfer Agent
6.4. SpamAssasin / rspamd
Spam-Mails erkennen und markieren
TODO: Installation und Setup genauer erklären
6.5. ClamAV
Virenscanner
TODO: Installation und Setup genauer erklären
6.6. Roundcube (?)
Webmailer
TODO: Installation und Setup genauer erklären
6.7. gpm
Mouse in Konsole verwenden
6.8. apticron
Bei bereitstehenden Updates eine E-Mail bekommen
{prompt-user}sudo apt install apticron
6.9. bootlogd
Neben den Kernel-Ausgaben auch die Ausgaben des Bootvorganges angeschauen.
6.10. Nextcloud
Private Cloud für Dateien, CardDAV, CalDAV, usw.
6.11. Mirror / Backup
Komplett-Backup auf Remote-System
6.12. Incremental Backup
Inkrementelles Backup System-Konfig, Daten, usw. auf externen Speicher zum Wiederherstellen zu verschiedenenen Zeitpunkten.
6.13. Wallabag
Eigenes "Pocket" - Speichern von Webseiten
6.14. OCR
Automatisch Scans in durchsuchbare PDFs umwandeln. Dokumentanmanagement für z.B. Rechnungen, Korrespondenz usw.
6.15. Postfix
Postfix als Alternative zu Exim4?
Anhang A: Quellen
A.1. Info
Hier sind nocnh einmal alle Quellen aufgeführt, die beim Schreiben dieses Tutorials geholfen haben.
A.2. Debian Live Image booten
A.3. Basissystems installieren
-
https://cryptsetup-team.pages.debian.net/cryptsetup/encrypted-boot.html
-
https://wiki.debian.org/de/Debootstrap, 2016-03-08
-
http://www.phoronix.com/scan.php?page=article&item=btrfs_lzo_2638&num=1
-
https://wiki.debian.org/LVM, 2016-03-08
-
https://wiki.ubuntuusers.de/LUKS, 2016-03-08
-
http://mockmoon-cybernetics.ch/computer/linux/arch/encrypted-root.html
-
http://www.pavelkogan.com/2014/05/23/luks-full-disk-encryption/, 2016-03-08
-
http://www.pavelkogan.com/2015/01/25/linux-mint-encryption/, 2016-03-08
-
https://www.rootathome.de/partition-verschluesseln-mit-dm-crypt-und-luks-unter-debian/
-
https://www.debian.org/releases/stable/amd64/release-notes, 2016-03-08
-
http://gw.tnode.com/debian/issues-and-workarounds-for-debian-8, 2016-03-08
-
http://www.linux-community.de/Internal/Artikel/Print-Artikel/LinuxUser/2013/04/apt-und-Aptitude-Teil-1, 2016-03-08
-
https://wiki.archlinux.org/title/Dm-crypt/Encrypting_an_entire_system#Encrypted_boot_partition_(GRUB)
A.4. Basissystems konfigurieren
A.5. Software installieren und konfigurieren
needfrestart * https://www.deimeke.net/dirk/blog/?/archives/3500-Restart-check-….html#c19494 * https://packages.debian.org/de/bullseye/debian-goodies
Fail2ban * https://www.fail2ban.org/ * https://serverfault.com/q/285256 * https://wireflare.com/blog/permanently-ban-repeat-offenders-with-fail2ban/ * https://web.archive.org/web/20201011111914/https://github.com/sergejmueller/sergejmueller.github.io/wiki/Fail2Ban:-IP-Blacklist * https://gist.github.com/sergejmueller/8171854
Samba
-
http://www.tim-bormann.de/anleitung-installation-samba-server-als-dateiserver-unter-debian-linux/
-
https://linuxconfig.org/how-to-configure-samba-server-share-on-debian-9-stretch-linux
-
https://linuxconfig.org/how-to-set-up-a-samba-server-on-debian-10-buster,2021-10-23
-
https://devconnected.com/how-to-install-samba-on-debian-10-buster/, 2021-10-23
Goodies
-
https://www.thomas-krenn.com/de/wiki/Voll-verschl%C3%BCsseltes-System_via_SSH_freischalten, 2016-03-08
-
https://wiki.ubuntuusers.de/Verschl%C3%BCsseltes_System_via_SSH_freischalten, 2016-03-08
-
http://blog.sanctum.geek.nz/putty-configuration, 2016-03-08
-
http://dag.wiee.rs/blog/content/improving-putty-settings-on-windows, 2016-03-08
-
http://ezprompt.net/, 2016-03-08
-
http://ethanschoonover.com/solarized, 2016-03-08
Server Setup
-
https://kb.linuxlove.xyz/index.html, 2021-10-19
Backup
-
rdiff-backup, 2021-10-23
-
rdiff-backup - howto, 2021-10-23
-
duplicity, 2021-10-23
Anhang B: Kopiervorlage Befehle
B.1. Info
Hier gibt es alle notwendigen Befehle je Kapitel für einfaches Copy & Paste.
B.2. Debian Live Image booten
B.2.1. Live Image besorgen
B.2.2. Tastaturlayout ändern (optional)
sudo dpkg-reconfigure keyboard-configuration
sudo setupcon
B.2.3. Encoding und Zeichensatz anpassen (optional)
sudo dpkg-reconfigure console-setup
B.2.4. Repositories aktualisieren
sudo apt update
B.2.5. ssh Zugang aktivieren (optional)
sudo apt install -y openssh-server
sudo systemctl start ssh
B.2.6. ssh Schlüssel-Fingerprint prüfen (optional)
for file in /etc/ssh/\*.pub; do ssh-keygen -l -f "${file}"; done | uniq
B.2.7. Login mittels ssh (optional)
[me@local ~]$ ssh user@debian
[me@local ~]$ ssh-keygen -l -F debian
[me@local ~]$ ssh-keygen -R debian
B.3. Basissystems installieren
B.3.1. Laufwerke vorbereiten
Gerätenamen ermitteln
lsblk

export DEVX=/dev/sdX
export DEVY=/dev/sdY
Magnetische Festplatte prüfen
sudo badblocks -c 1024 -s -w -t random -v ${DEVY}
Partitionierung
sudo cfdisk ${DEVX}

sudo cfdisk ${DEVY}

printf "g\nn\n\n\n+1M\nt\n4\nn\n\n\n+250M\nn\n\n\n-1G\nn\n\n\n\nt\n\n19\nw\n" | sudo fdisk ${DEVX}

printf "g\nn\n\n\n\nw\n" | sudo fdisk ${DEVY}

lsblk
B.4. Vollverschlüsselung des Systems
unverschlüsselte Boot-Partition
sudo mkfs.ext4 -L BOOT ${DEVX}2
Festplattenverschlüsselung mit cryptsetup
sudo apt install -y cryptsetup
Schlüsseldateien erzeugen
tr -dc '[:graph:]' </dev/urandom | head -c 128 > data.key
tr -dc '[:graph:]' </dev/urandom | head -c 128 > root.key
tr -dc '[:graph:]' </dev/urandom | head -c 128 > swap.key
sudo chown root:root *.key
sudo chmod 600 *.key
Partitionen verschlüsseln
sudo cryptsetup -c aes-xts-plain64 -s 512 luksFormat ${DEVX}3
sudo cryptsetup luksAddKey ${DEVX}3 root.key
sudo cat root.key | sudo cryptsetup luksOpen ${DEVX}3 crypt_root
sudo mkfs.ext4 -L ROOT /dev/mapper/crypt_root

sudo cryptsetup -c aes-xts-plain64 -s 512 luksFormat ${DEVX}4
sudo cryptsetup luksAddKey ${DEVX}4 swap.key
sudo cat swap.key | sudo cryptsetup open ${DEVX}4 crypt_swap
sudo mkswap -L SWAP /dev/mapper/crypt_swap

sudo cryptsetup -c aes-xts-plain64 -s 512 luksFormat ${DEVY}1
sudo cryptsetup luksAddKey ${DEVY}1 data.key
sudo cat data.key | sudo cryptsetup open ${DEVY}1 crypt_data
sudo mkfs.ext4 -L DATA /dev/mapper/crypt_data

lsblk
B.4.1. Partitionen einbinden
sudo mkdir /mnt/debinst
sudo mount /dev/mapper/crypt_root /mnt/debinst

sudo mkdir /mnt/debinst/boot
sudo mount ${DEVX}2 /mnt/debinst/boot

sudo mkdir /mnt/debinst/data
sudo mount /dev/mapper/crypt_data /mnt/debinst/data
B.4.2. Basissystem mittels Debootstrap installieren
sudo apt install -y debootstrap
sudo debootstrap --arch amd64 bullseye /mnt/debinst http://deb.debian.org/debian
B.4.3. chroot Umgebung vorbereiten
sudo mkdir -m0700 /mnt/debinst/etc/keys
sudo cp *.key /mnt/debinst/etc/keys
sudo sh -c 'chmod 600 /mnt/debinst/etc/keys/*'

sudo mount -o bind /dev /mnt/debinst/dev
sudo mount -t proc proc /mnt/debinst/proc
sudo mount -t sysfs sys /mnt/debinst/sys
sudo mount -t devpts devpts /mnt/debinst/dev/pts

sudo LANG=C chroot /mnt/debinst /bin/bash
B.4.4. Basissystem fertig stellen
Passwort für root vergeben
passwd
Console einstellen
apt install -y keyboard-configuration

apt install -y console-setup
setupcon

dpkg-reconfigure console-setup
Zeitzone und Sprache(n) einstellen
dpkg-reconfigure tzdata
apt install -y locales
dpkg-reconfigure locales
Editor anpassen
apt install -y vim
apt purge -y nano
Paketquellen aufnehmen
apt install -y ca-certificates

MIRROR=https://deb.debian.org

printf "# DebianReleases\n">/etc/apt/sources.list
printf "deb ${MIRROR}/debian bullseye main contrib non-free\n">>/etc/apt/sources.list
printf "#deb-src ${MIRROR}/debian bullseye main contrib non-free\n">>/etc/apt/sources.list
printf "\n# DebianSecurity\n">>/etc/apt/sources.list
printf "deb https://deb.debian.org/debian-security/ bullseye-security main contrib non-free\n">>/etc/apt/sources.list
printf "#deb-src https://deb.debian.org/debian-security/ bullseye-security main contrib non-free\n">>/etc/apt/sources.list
printf "\n# StableUpdates\n">>/etc/apt/sources.list
printf "deb ${MIRROR}/debian bullseye-updates main contrib non-free\n">>/etc/apt/sources.list
printf "#deb-src ${MIRROR}/debian bullseye-updates main contrib non-free\n">>/etc/apt/sources.list
printf "\n# DebianBackports\n">>/etc/apt/sources.list
printf "deb ${MIRROR}/debian bullseye-backports main contrib non-free\n">>/etc/apt/sources.list
printf "#deb-src ${MIRROR}/debian bullseye-backports main contrib non-free\n">>/etc/apt/sources.list
System aktualisieren
apt update
apt full-upgrade -y
Cryptsetup und Filesysteme einrichten
apt install -y cryptsetup

export DEVX=/dev/sdX
export DEVY=/dev/sdY

printf "# <target name> <source device>                        <key file>          <options>\n">/etc/crypttab
printf "crypt_root  UUID=$(blkid -o value -s UUID ${DEVX}3)   none                luks\n">>/etc/crypttab
printf "crypt_swap  UUID=$(blkid -o value -s UUID ${DEVX}4)   /etc/keys/swap.key  luks,key-slot=1\n">>/etc/crypttab
printf "crypt_data  UUID=$(blkid -o value -s UUID ${DEVY}1)   /etc/keys/data.key  luks,key-slot=1\n">>/etc/crypttab

printf "# /etc/fstab: static file system information.\n">/etc/fstab
printf "#\n">>/etc/fstab
printf "# file system           mount point  type  options            dump  pass\n">>/etc/fstab
printf "proc                   /proc        proc  defaults           0     0\n">>/etc/fstab
printf "/dev/disk/by-uuid/$(blkid -o value -s UUID ${DEVX}2)  /boot        ext4  errors=remount-ro  0     2\n">>/etc/fstab
printf "/dev/mapper/crypt_root  /            ext4  errors=remount-ro  0     1\n">>/etc/fstab
printf "/dev/mapper/crypt_data  /data        ext4  errors=remount-ro  0     2\n">>/etc/fstab
printf "/dev/mapper/crypt_swap  none         swap  sw                 0     0\n">>/etc/fstab

ln -sf /proc/mounts /etc/mtab
Netzwerk einrichten
printf "auto lo\n">/etc/network/interfaces.d/loopback
printf "iface lo inet loopback\n">>/etc/network/interfaces.d/loopback

ip link show

INTERFACE=enp0s3
printf "auto ${INTERFACE}\n">/etc/network/interfaces.d/${INTERFACE}
printf "allow-hotplug ${INTERFACE}\n">>/etc/network/interfaces.d/${INTERFACE}
printf "iface ${INTERFACE} inet dhcp\n">>/etc/network/interfaces.d/${INTERFACE}

echo MeinDebianServerName > /etc/hostname

sed -i 's/localhost/& MeinDebianServerName/g' /etc/hosts
Bootloader Grub einrichten
apt search linux-image

apt install -y linux-image-amd64

apt install -y grub-pc
echo "GRUB_ENABLE_CRYPTODISK=y" >>/etc/default/grub
grub-install ${DEVX}

update-initramfs -u -k all
update-grub
B.4.5. System Reboot vorbereiten
Dropbear installieren
apt install -y dropbear-initramfs

vi /etc/initramfs-tools/initramfs.conf

vi /etc/dropbear-initramfs/authorized_keys

update-initramfs -u -k all

for keyfile in /etc/dropbear-initramfs/dropbear_*_host_key; do echo "${keyfile}:"; dropbearkey -y -f "${file}"; done
OpenSSH installieren
apt install -y openssh-server
B.4.6. System rebooten
exit

sudo reboot
B.5. Basissystems konfigurieren
B.5.1. Nützliche Einstellungen
printf "PS1='\${debian_chroot:+(\$debian_chroot)}\\\\[\\\\033[01;31m\\\\]\\\\u@\\\\h\\\\[\\\\033[00m\\\\]:\[\\\\033[01;34m\\\\]\\\\w\\\\[\\\\033[00m\\\\]\$ '\n">>~/.bashrc
apt install -y beep
printf "[Unit]\n">/etc/systemd/system/beep.service
printf "Description=Beep on startup\n">>/etc/systemd/system/beep.service
printf "After=multi-user.target\n">>/etc/systemd/system/beep.service
printf "\n[Service]\n">>/etc/systemd/system/beep.service
printf "ExecStart=/usr/bin/beep -l 100 -r 3 -f 500\n">>/etc/systemd/system/beep.service
printf "\n[Install]\n">>/etc/systemd/system/beep.service
printf "WantedBy=multi-user.target\n">>/etc/systemd/system/beep.service
systemctl daemon-reload
systemctl enable beep.service
B.5.2. User anlegen
adduser user
B.5.3. sudo
apt install -y sudo
User der Gruppe sudo hinzufügen
adduser user sudo
Rootshell mit sudo
sudo -i
B.6. Software installieren und konfigurieren
B.6.1. Goodies
bash-completion
sudo apt install -y bash-completion
man
sudo apt install -y man
needrestart
sudo apt install -y needrestart
rsync
sudo apt install -y rsync
B.6.2. Fail2Ban
Installation
sudo apt install -y fail2ban
jail.local
sudo sh -c 'printf "# Änderungen gegenüber den Standard-Einstellungen von Debian Bullseye\n" > /etc/fail2ban/jail.local'
sudo sh -c 'printf "\n" >> /etc/fail2ban/jail.local'
sudo sh -c 'printf "[DEFAULT]\n" >> /etc/fail2ban/jail.local'
sudo sh -c 'printf "# Umstellung auf nftables\n" >> /etc/fail2ban/jail.local'
sudo sh -c 'printf "banaction = nftables-multiport\n" >> /etc/fail2ban/jail.local'
sudo sh -c 'printf "banaction_allports = nftables-allports\n" >> /etc/fail2ban/jail.local'
sudo sh -c 'printf "\n" >> /etc/fail2ban/jail.local'
sudo sh -c 'printf "# Action soll auch gleich eine Mail senden\n" >> /etc/fail2ban/jail.local'
sudo sh -c 'printf "action = %%(action_mwl)s\n" >> /etc/fail2ban/jail.local'
sudo sh -c 'printf "\n" >> /etc/fail2ban/jail.local'
sudo sh -c 'printf "# IP-Adressen, die nicht gesperrt werden sollen\n" >> /etc/fail2ban/jail.local'
sudo sh -c 'printf "# ignoreip = x.x.x.x y.y.y.y z.z.z.z\n" >> /etc/fail2ban/jail.local'
sudo sh -c 'printf "\n" >> /etc/fail2ban/jail.local'
sudo sh -c 'printf "# Maximale Anzahl an Versuchen\n" >> /etc/fail2ban/jail.local'
sudo sh -c 'printf "maxretry = 3\n" >> /etc/fail2ban/jail.local'
sudo sh -c 'printf "\n" >> /etc/fail2ban/jail.local'
sudo sh -c 'printf "[recidive]\n" >> /etc/fail2ban/jail.local'
sudo sh -c 'printf "# Umstellung auf nftables\n" >> /etc/fail2ban/jail.local'
sudo sh -c 'printf "banaction = nftables-allports\n" >> /etc/fail2ban/jail.local'
sudo sh -c 'printf "\n" >> /etc/fail2ban/jail.local'
unban
sudo fail2ban-client set <JAIL> unbanip <IP>
IP-Blacklist
sudo sh -c 'printf "# /etc/fail2ban/action.d/blacklist.conf\n" > /etc/fail2ban/action.d/blacklist.conf'
sudo sh -c 'printf "#\n" >> /etc/fail2ban/action.d/blacklist.conf'
sudo sh -c 'printf "# fail2ban: Permanent blocking of repeat offenders\n" >> /etc/fail2ban/action.d/blacklist.conf'
sudo sh -c 'printf "# Author: Stefan Bohn <stefan.bohn@gmail.com>\n" >> /etc/fail2ban/action.d/blacklist.conf'
sudo sh -c 'printf "#\n" >> /etc/fail2ban/action.d/blacklist.conf'
sudo sh -c 'printf "# Based on: https://github.com/mitchellkrogza/Fail2Ban-Blacklist-JAIL-for-Repeat-Offenders-with-Perma-Extended-Banning\n" >> /etc/fail2ban/action.d/blacklist.conf'
sudo sh -c 'printf "#\n" >> /etc/fail2ban/action.d/blacklist.conf'
sudo sh -c 'printf "# Tested On: 0.11.2\n" >> /etc/fail2ban/action.d/blacklist.conf'
sudo sh -c 'printf "# Server: Debian Bullseye 11.0\n" >> /etc/fail2ban/action.d/blacklist.conf'
sudo sh -c 'printf "# Firewall: nftables\n" >> /etc/fail2ban/action.d/blacklist.conf'
sudo sh -c 'printf "#\n" >> /etc/fail2ban/action.d/blacklist.conf'
sudo sh -c 'printf "# requires:\n" >> /etc/fail2ban/action.d/blacklist.conf'
sudo sh -c 'printf "#    /etc/fail2ban/filter.d/blacklist.conf\n" >> /etc/fail2ban/action.d/blacklist.conf'
sudo sh -c 'printf "#    /etc/fail2ban/jail.d/blacklist.conf\n" >> /etc/fail2ban/action.d/blacklist.conf'
sudo sh -c 'printf "\n" >> /etc/fail2ban/action.d/blacklist.conf'
sudo sh -c 'printf "[INCLUDES]\n" >> /etc/fail2ban/action.d/blacklist.conf'
sudo sh -c 'printf "before = nftables.conf\n" >> /etc/fail2ban/action.d/blacklist.conf'
sudo sh -c 'printf "\n" >> /etc/fail2ban/action.d/blacklist.conf'
sudo sh -c 'printf "\n" >> /etc/fail2ban/action.d/blacklist.conf'
sudo sh -c 'printf "[Definition]\n" >> /etc/fail2ban/action.d/blacklist.conf'
sudo sh -c 'printf "# Option:  actionstart\n" >> /etc/fail2ban/action.d/blacklist.conf'
sudo sh -c 'printf "# Notes.:  command executed once at the start of Fail2Ban.\n" >> /etc/fail2ban/action.d/blacklist.conf'
sudo sh -c 'printf "# Values:  CMD\n" >> /etc/fail2ban/action.d/blacklist.conf'
sudo sh -c 'printf "#\n" >> /etc/fail2ban/action.d/blacklist.conf'
sudo sh -c 'printf "actionstart = <nftables> add table <table_family> <table>\n" >> /etc/fail2ban/action.d/blacklist.conf'
sudo sh -c 'printf "              <nftables> -- add chain <table_family> <table> <chain> \{ type <chain_type> hook <chain_hook> priority <chain_priority> \; \}\n" >> /etc/fail2ban/action.d/blacklist.conf'
sudo sh -c 'printf "              %%(_nft_add_set)s\n" >> /etc/fail2ban/action.d/blacklist.conf'
sudo sh -c 'printf "              # Sort IPs in the ip.blacklist-<addr_set> file and remove duplicates\n" >> /etc/fail2ban/action.d/blacklist.conf'
sudo sh -c 'printf "              sort --field-separator=\. -k1,1 -k2,2 -k3,3 -k4,4 -n -u /etc/fail2ban/ip.blacklist-<addr_set> -o /etc/fail2ban/ip.blacklist-<addr_set>\n" >> /etc/fail2ban/action.d/blacklist.conf'
sudo sh -c 'printf "              # Persistent banning of IPs reading them from the ip.blacklist-<addr_set> file\n" >> /etc/fail2ban/action.d/blacklist.conf'
sudo sh -c 'printf "              # and adding them to nftables on the jail startup command\n" >> /etc/fail2ban/action.d/blacklist.conf'
sudo sh -c 'printf "              cat /etc/fail2ban/ip.blacklist-<addr_set> | awk '\''{print \$1}'\'' | while read IP; do\n" >> /etc/fail2ban/action.d/blacklist.conf'
sudo sh -c 'printf "                  <nftables> add element <table_family> <table> <addr_set> \{ \$IP \}\n" >> /etc/fail2ban/action.d/blacklist.conf'
sudo sh -c 'printf "              done\n"  >> /etc/fail2ban/action.d/blacklist.conf'
sudo sh -c 'printf "\n" >> /etc/fail2ban/action.d/blacklist.conf'
sudo sh -c 'printf "# Option:  actionban\n" >> /etc/fail2ban/action.d/blacklist.conf'
sudo sh -c 'printf "# Notes.:  command executed when banning an IP. Take care that the\n" >> /etc/fail2ban/action.d/blacklist.conf'
sudo sh -c 'printf "#          command is executed with Fail2Ban user rights.\n" >> /etc/fail2ban/action.d/blacklist.conf'
sudo sh -c 'printf "# Tags:    See jail.conf(5) man page\n" >> /etc/fail2ban/action.d/blacklist.conf'
sudo sh -c 'printf "# Values:  CMD\n" >> /etc/fail2ban/action.d/blacklist.conf'
sudo sh -c 'printf "#\n" >> /etc/fail2ban/action.d/blacklist.conf'
sudo sh -c 'printf "actionban = <nftables> add element <table_family> <table> <addr_set> \{ <ip> \}\n" >> /etc/fail2ban/action.d/blacklist.conf'
sudo sh -c 'printf "            # Add the new IP ban to our ip.blacklist file\n" >> /etc/fail2ban/action.d/blacklist.conf'
sudo sh -c 'printf "            echo \"<ip> - \$(date '\''+%%%%Y-%%%%m-%%%%d %%%%H:%%%%M:%%%%S'\'')\" >> /etc/fail2ban/ip.blacklist-<addr_set>\n"  >> /etc/fail2ban/action.d/blacklist.conf'
sudo sh -c 'printf "\n" >> /etc/fail2ban/action.d/blacklist.conf'
sudo sh -c 'printf "# Option:  actionunban\n" >> /etc/fail2ban/action.d/blacklist.conf'
sudo sh -c 'printf "# Notes.:  command executed when unbanning an IP. Take care that the\n" >> /etc/fail2ban/action.d/blacklist.conf'
sudo sh -c 'printf "#          command is executed with Fail2Ban user rights.\n" >> /etc/fail2ban/action.d/blacklist.conf'
sudo sh -c 'printf "# Tags:    See jail.conf(5) man page\n" >> /etc/fail2ban/action.d/blacklist.conf'
sudo sh -c 'printf "# Values:  CMD\n" >> /etc/fail2ban/action.d/blacklist.conf'
sudo sh -c 'printf "#\n" >> /etc/fail2ban/action.d/blacklist.conf'
sudo sh -c 'printf "actionunban = <nftables> delete element <table_family> <table> <addr_set> \{ <ip> \}\n" >> /etc/fail2ban/action.d/blacklist.conf'
sudo sh -c 'printf "              # Remove IP from our ip.blacklist file\n" >> /etc/fail2ban/action.d/blacklist.conf'
sudo sh -c 'printf "              sed -i -e '\''/<ip>/d'\'' /etc/fail2ban/ip.blacklist-<addr_set>\n" >> /etc/fail2ban/action.d/blacklist.conf'
sudo sh -c 'printf "\n" >> /etc/fail2ban/action.d/blacklist.conf'
sudo sh -c 'printf "[Init]\n" >> /etc/fail2ban/action.d/blacklist.conf'
sudo sh -c 'printf "# /etc/fail2ban/filter.d/blacklist.conf\n" > /etc/fail2ban/filter.d/blacklist.conf'
sudo sh -c 'printf "#\n" >> /etc/fail2ban/filter.d/blacklist.conf'
sudo sh -c 'printf "# fail2ban: Permanent blocking of repeat offenders\n" >> /etc/fail2ban/filter.d/blacklist.conf'
sudo sh -c 'printf "# Author: Stefan Bohn <stefan.bohn@gmail.com>\n" >> /etc/fail2ban/filter.d/blacklist.conf'
sudo sh -c 'printf "#\n" >> /etc/fail2ban/filter.d/blacklist.conf'
sudo sh -c 'printf "# Based on: https://github.com/mitchellkrogza/Fail2Ban-Blacklist-JAIL-for-Repeat-Offenders-with-Perma-Extended-Banning\n" >> /etc/fail2ban/filter.d/blacklist.conf'
sudo sh -c 'printf "#\n" >> /etc/fail2ban/filter.d/blacklist.conf'
sudo sh -c 'printf "# Tested On: 0.11.2\n" >> /etc/fail2ban/filter.d/blacklist.conf'
sudo sh -c 'printf "# Server: Debian Bullseye 11.0\n" >> /etc/fail2ban/filter.d/blacklist.conf'
sudo sh -c 'printf "# Firewall: nftables\n" >> /etc/fail2ban/filter.d/blacklist.conf'
sudo sh -c 'printf "#\n" >> /etc/fail2ban/filter.d/blacklist.conf'
sudo sh -c 'printf "# requires:\n" >> /etc/fail2ban/filter.d/blacklist.conf'
sudo sh -c 'printf "#    /etc/fail2ban/action.d/blacklist.conf\n" >> /etc/fail2ban/filter.d/blacklist.conf'
sudo sh -c 'printf "#    /etc/fail2ban/jail.d/blacklist.conf\n" >> /etc/fail2ban/filter.d/blacklist.conf'
sudo sh -c 'printf "\n" >> /etc/fail2ban/filter.d/blacklist.conf'
sudo sh -c 'printf "[INCLUDES]\n" >> /etc/fail2ban/filter.d/blacklist.conf'
sudo sh -c 'printf "before = common.conf\n" >> /etc/fail2ban/filter.d/blacklist.conf'
sudo sh -c 'printf "\n" >> /etc/fail2ban/filter.d/blacklist.conf'
sudo sh -c 'printf "[Definition]\n" >> /etc/fail2ban/filter.d/blacklist.conf'
sudo sh -c 'printf "_daemon = fail2ban\.actions\s*\n" >> /etc/fail2ban/filter.d/blacklist.conf'
sudo sh -c 'printf "_jailname = blacklist\n" >> /etc/fail2ban/filter.d/blacklist.conf'
sudo sh -c 'printf "failregex = ^(%%(__prefix_line)s| %%(_daemon)s%%(__pid_re)s?:\s+)NOTICE\s+\[(?!%%(_jailname)s\])(?:.*)\]\s+Ban\s+<HOST>\s*\$\n" >> /etc/fail2ban/filter.d/blacklist.conf'
sudo sh -c 'printf "ignoreregex =\n" >> /etc/fail2ban/filter.d/blacklist.conf'
sudo sh -c 'printf "\n" >> /etc/fail2ban/filter.d/blacklist.conf'
sudo sh -c 'printf "[Init]\n" >> /etc/fail2ban/filter.d/blacklist.conf'
sudo sh -c 'printf "journalmatch = _SYSTEMD_UNIT=fail2ban.service PRIORITY=5\n" >> /etc/fail2ban/filter.d/blacklist.conf'
sudo sh -c 'printf "# /etc/fail2ban/jail.d/blacklist.conf\n" > /etc/fail2ban/jail.d/blacklist.conf'
sudo sh -c 'printf "#\n" >> /etc/fail2ban/jail.d/blacklist.conf'
sudo sh -c 'printf "# fail2ban: Permanent blocking of repeat offenders\n" >> /etc/fail2ban/jail.d/blacklist.conf'
sudo sh -c 'printf "# Author: Stefan Bohn <stefan.bohn@gmail.com>\n" >> /etc/fail2ban/jail.d/blacklist.conf'
sudo sh -c 'printf "#\n" >> /etc/fail2ban/jail.d/blacklist.conf'
sudo sh -c 'printf "# Based on: https://github.com/mitchellkrogza/Fail2Ban-Blacklist-JAIL-for-Repeat-Offenders-with-Perma-Extended-Banning\n" >> /etc/fail2ban/jail.d/blacklist.conf'
sudo sh -c 'printf "#\n" >> /etc/fail2ban/jail.d/blacklist.conf'
sudo sh -c 'printf "# Tested On: 0.11.2\n" >> /etc/fail2ban/jail.d/blacklist.conf'
sudo sh -c 'printf "# Server: Debian Bullseye 11.0\n" >> /etc/fail2ban/jail.d/blacklist.conf'
sudo sh -c 'printf "# Firewall: nftables\n" >> /etc/fail2ban/jail.d/blacklist.conf'
sudo sh -c 'printf "#\n" >> /etc/fail2ban/jail.d/blacklist.conf'
sudo sh -c 'printf "# requires:\n" >> /etc/fail2ban/jail.d/blacklist.conf'
sudo sh -c 'printf "#    /etc/fail2ban/action.d/blacklist.conf\n" >> /etc/fail2ban/jail.d/blacklist.conf'
sudo sh -c 'printf "#    /etc/fail2ban/filter.d/blacklist.conf\n" >> /etc/fail2ban/jail.d/blacklist.conf'
sudo sh -c 'printf "\n" >> /etc/fail2ban/jail.d/blacklist.conf'
sudo sh -c 'printf "[blacklist]\n" >> /etc/fail2ban/jail.d/blacklist.conf'
sudo sh -c 'printf "enabled = true\n" >> /etc/fail2ban/jail.d/blacklist.conf'
sudo sh -c 'printf "action_ = %%(banaction)s[port=\"%%(port)s\", protocol=\"%%(protocol)s\", chain=\"%%(chain)s\", actionstart_on_demand=false]\n" >> /etc/fail2ban/jail.d/blacklist.conf'
sudo sh -c 'printf "logpath  = %%(blacklist_ip_log)s\n" >> /etc/fail2ban/jail.d/blacklist.conf'
sudo sh -c 'printf "port = 0:65535\n" >> /etc/fail2ban/jail.d/blacklist.conf'
sudo sh -c 'printf "filter = blacklist\n" >> /etc/fail2ban/jail.d/blacklist.conf'
sudo sh -c 'printf "banaction = blacklist\n" >> /etc/fail2ban/jail.d/blacklist.conf'
sudo sh -c 'printf "bantime  = 31536000   ; 1 year\n" >> /etc/fail2ban/jail.d/blacklist.conf'
sudo sh -c 'printf "findtime = 31536000   ; 1 year\n" >> /etc/fail2ban/jail.d/blacklist.conf'
sudo sh -c 'printf "maxretry = 10\n" >> /etc/fail2ban/jail.d/blacklist.conf'
sudo sh -c 'printf "[DEFAULT]\n" > /etc/fail2ban/paths-debian.local'
sudo sh -c 'printf "blacklist_ip_log = /var/log/fail2ban.*\n" >> /etc/fail2ban/paths-debian.local'
sudo sh -c 'printf "\n" >> /etc/fail2ban/paths-debian.local'
sudo systemctl restart fail2ban.service
sudo sh -c 'printf "/var/log/fail2ban.log {\n" > /etc/logrotate.d/fail2ban'
sudo sh -c 'printf "\n" >> /etc/logrotate.d/fail2ban'
sudo sh -c 'printf "    monthly\n" >> /etc/logrotate.d/fail2ban'
sudo sh -c 'printf "    rotate 13\n" >> /etc/logrotate.d/fail2ban'
sudo sh -c 'printf "    # Do not rotate if empty\n" >> /etc/logrotate.d/fail2ban'
sudo sh -c 'printf "    notifempty\n" >> /etc/logrotate.d/fail2ban'
sudo sh -c 'printf "\n" >> /etc/logrotate.d/fail2ban'
sudo sh -c 'printf "    delaycompress\n" >> /etc/logrotate.d/fail2ban'
sudo sh -c 'printf "    missingok\n" >> /etc/logrotate.d/fail2ban'
sudo sh -c 'printf "    postrotate\n" >> /etc/logrotate.d/fail2ban'
sudo sh -c 'printf "        fail2ban-client flushlogs 1>/dev/null\n" >> /etc/logrotate.d/fail2ban'
sudo sh -c 'printf "    endscript\n" >> /etc/logrotate.d/fail2ban'
sudo sh -c 'printf "\n" >> /etc/logrotate.d/fail2ban'
sudo sh -c 'printf "    # If fail2ban runs as non-root it still needs to have write access\n" >> /etc/logrotate.d/fail2ban'
sudo sh -c 'printf "    # to logfiles.\n" >> /etc/logrotate.d/fail2ban'
sudo sh -c 'printf "    # create 640 fail2ban adm\n" >> /etc/logrotate.d/fail2ban'
sudo sh -c 'printf "    create 640 root adm\n" >> /etc/logrotate.d/fail2ban'
sudo sh -c 'printf "}\n" >> /etc/logrotate.d/fail2ban'
sudo systemctl restart logrotate.service
B.6.3. Samba
sudo apt install -y samba
Anhang C: unverschlüsselte Boot-Partition
|
/etc/crypttab
# <target name> <source device>                        <key file>          <options>
crypt_root  UUID=b6092421-ffa0-43ac-a77d-f61eb52a146c  none                luks
crypt_swap  UUID=2697df81-8ed3-43c4-a7bb-4bdd2bf28113  /etc/keys/swap.key  luks,key-slot=1
crypt_data  UUID=6ad221c7-fb28-42b8-a86e-13e69dc78adc  /etc/keys/data.key  luks,key-slot=1
/etc/fstab
# /etc/fstab: static file system information.
#
# file system           mount point  type  options            dump  pass
proc                    /proc        proc  defaults           0     0
/dev/disk/by-uuid/a1ea5452-151b-44f5-8189-e9a8d69807cf  /boot        ext4  errors=remount-ro  0     2
/dev/mapper/crypt_root  /            ext4  errors=remount-ro  0     1
/dev/mapper/crypt_data  /data        ext4  errors=remount-ro  0     2
/dev/mapper/crypt_swap  none         swap  sw                 0     0
dropbear
apt install -y dropbear-initramfs # vi /etc/initramfs-tools/initramfs.conf vi /etc/dropbear-initramfs/authorized_keys update-initramfs -u -k all dropbearkey -y -f /etc/dropbear-initramfs/dropbear_rsa_host_key |
C.1. Dropbear SSH
TODO: Installation und Setup genauer erklären
Dropbear wird benötigt, wenn beim Booten die Passphrase nicht direkt eingegeben werden kann. Das ist z.B.bei einem Server der Fall, der nur über Netzwerk erreichbar ist.
-
(wheezy) https://www.hennignetz.de/howtos/debian_wheezy_luks_ssh_initrd.shtml
-
https://www.thomas-krenn.com/de/wiki/Voll-verschl%C3%BCsseltes-System_via_SSH_freischalten
-
https://wiki.ubuntuusers.de/Archiv/Verschl%C3%BCsseltes_System_via_SSH_freischalten/
-
https://linuxconfig.org/how-to-install-and-configure-dropbear-on-linux
root@debian:/# apt install -y dropbear-initramfs
root@debian:/# vi /etc/initramfs-tools/initramfs.conf
#
# DEVICE: ...
#
# Specify a specific network interface, like eth0
# Overridden by optional ip= bootarg
#

DEVICE=enp0s3
IP=<IP-Adresse>:::255.255.255.0::enp0s3:off
Public Key zum Aufschliessen kopieren
root@debian:/# vi /etc/dropbear-initramfs/authorized_keys
root@debian:/# update-initramfs -u -k all
Remote-Freischalten
root@debian:/# for file in /etc/dropbear-initramfs/dropbear_*_host_key; do echo "${file}:"; dropbearkey -y -f "${file}"; done
/etc/dropbear-initramfs/dropbear_ecdsa_host_key:
Public key portion is:
ecdsa-sha2-nistp256 AAAAE2VjZHNhLXNoYTItbmlzdHAyNTYAAAAIbmlzdHAyNTYAAABBBEwr2lN5yO1EENJYJOymhsP0HfwS6um7jFKqNgZwtx0DUkMfBcTNP+MR+kqPhx2hVhSbuV/OedFvGWLULxCKsnw= root@debian (1)
Fingerprint: sha1!! d3:f1:3e:7f:d8:3e:25:9d:ea:f1:f0:63:93:28:13:ce:dc:6a:32:1d
/etc/dropbear-initramfs/dropbear_ed25519_host_key:
Public key portion is:
ssh-ed25519 AAAAC3NzaC1lZDI1NTE5AAAAIP4fh5rQmMHF7ru0DBcYDWzTD7LEZtHAjGtF5TlPlX88 root@debian (1)
Fingerprint: sha1!! 08:8b:f7:1f:65:89:ef:e4:b2:cc:34:24:40:9a:79:63:b1:0a:91:4e
/etc/dropbear-initramfs/dropbear_rsa_host_key:
Public key portion is:
ssh-rsa AAAAB3NzaC1yc2EAAAADAQABAAABAQCvMbVQS5KoBQrFCnvw0/SErOKSTKmdwXjEY0+5IxsQHzK4h1e18qZFZBU1PdkwcS2Fqut/sb7lF5+eFQAl7JAHlEKT5BpWS4tIHXWKlA3wiiNi6r6IUC/W86rVPecFYf3cD+GsMkJA3hYls0D0OlkP4hYQkoNNfClP36350VGDv0WZnyH07L9/YkTWIe54c0y2Izbrb4IFtOvxfuYxnUeF7g+Qwx13Wcdau1kCyCS2PtSAGnfqH/D24XTZsEU6RhTturIYO43XYt3tWajreRF7rCHkfZrW5xAPAUt2ir9gPRTPogDSNnM82ewyJxccDF+3x0nE7jknXJI0l3e5i0q/ root@debian (1)
Fingerprint: sha1!! 85:3b:c1:61:44:52:b1:a7:cf:3b:2c:ec:c8:f5:00:7b:77:b3:4c:d5
| 1 | Gewünschte Public Key in eine lokale Datei ´known_hosts.dropbear` kopieren |
TODO: Anstelle die Passphrase mittels ssh und echo sollte das unlock-Script verwendet werden. So wird die Passphrase nirgends sichtbar.
#!/bin/bash
ssh -o "UserKnownHostsFile=./known_hosts.dropbear" -i /path/to/id_rsa_for_dropbear root@<IP-Adresse> "echo -ne \"PassPhrase To Unlock Disks\" > /lib/cryptsetup/passfifo"